Purpose
The intent of this document is to provide a canonical source of prescriptive instruction sets for common administrator and user tasks using Apache NiFi. It is intended to complement the NiFi Overview, NiFi System Administrator’s Guide, and NiFi User’s Guide. Those documents provide extensive reference information about various features and configuration values, but they do not provide information on how to accomplish tasks.
This document is not intended to be a comprehensive repository of all possible admin or user activities, but rather a collection of well-documented reference activities which can be followed directly or adapted to custom scenarios. This document requires continued updates as application or ecosystem behavior changes, and corrections and improvements where the content is unclear to the community. To contribute to this document, please open a Jira (see further instructions in the Contributor Guide) and submit a pull request (PR).
| This document is provided with no warranty. All steps have been evaluated for correctness to the extent possible by the Apache NiFi community, but no responsibility is assumed for negative impacts on any computer system where these commands are executed. |
Installing Apache NiFi
Apache NiFi is an easy to use, powerful, and reliable system to process and distribute data. It supports powerful and scalable directed graphs of data routing, transformation, and system mediation logic. In addition to NiFi, there is the NiFi Toolkit, a collection of command-line tools which help perform administrative tasks such as interacting with remote services, generating TLS certificates, managing nodes in a cluster, and encrypting sensitive configuration values.
Description |
Instructions on downloading the Apache NiFi application and Toolkit |
Purpose |
To make the application available to run on the specified machine (e.g. a local development environment) |
Starting Point |
Machine running modern OS |
Expected Outcome |
Latest version of Apache NiFi available to run on host with no configuration |
Estimated Duration |
1 minute + download time |
| The following instructions are for installing a single node of NiFi. This guide assumes macOS 10.11.0+ but should work for any modern operating system. *nix commands are used by default, but Windows equivalents are provided where available. |
-
Go to the Apache NiFi Downloads page.
-
Download the latest version of NiFi via the compressed binary files. For example, if the latest version is 1.11.4:
-
nifi-1.11.4-bin.tar.gz[1.2 GB] -
nifi-toolkit-1.11.4-bin.tar.gz[42 MB]
-
-
If you are directed to a mirror page, click the first link on the page to download the respective archive file.

-
Note that the
nifi-1.11.4-bin.tar.gzand thenifi-toolkit-1.11.4-bin.tar.gzcompressed files are downloaded to yourDownloadsfolder. -
Download the GPG signature and checksums for those files. They are found on the initial download page next to each binary file.
-
gpg --verify -v nifi-1.11.4-bin.tar.gz.asc— Verifies the GPG signature provided on the binary by the Release Manager (RM). See NiFi GPG Guide: Verifying a Release Signature for further details -
shasum -a 256 nifi-1.11.4-bin.tar.gz— Calculates a SHA-256 checksum over the downloaded artifact. This should be compared with the contents ofnifi-1.11.4-bin.tar.gz.sha256for equality -
shasum -a 512 nifi-1.11.4-bin.tar.gz— Calculates a SHA-512 checksum over the downloaded artifact. This should be compared with the contents ofnifi-1.11.4-bin.tar.gz.sha512for equality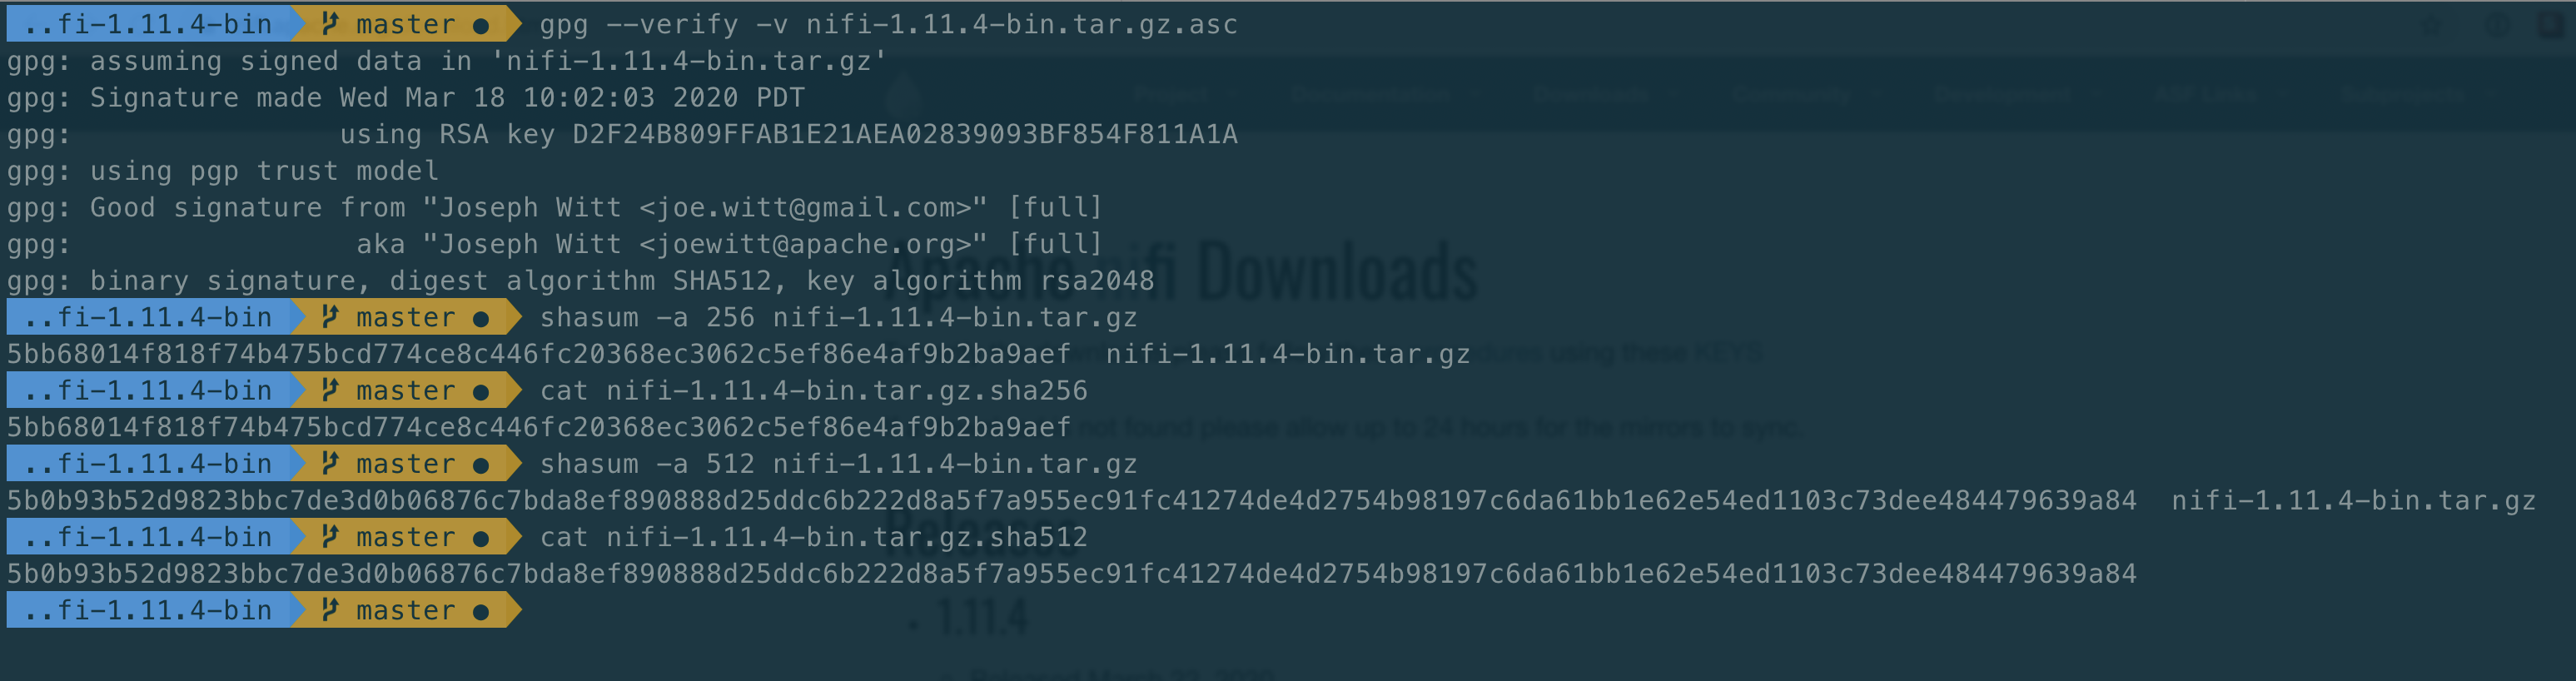
-
-
Extract the files from each
tar.gzfile. This can be done by double-clicking on the files in the Finder or running the following commands in the terminal.-
tar -xvzf nifi-1.11.4-bin.tar.gz— Uncompresses thegzipfile and extracts thetararchive contents tonifi-1.11.4/ -
tar -xvzf nifi-toolkit-1.11.4-bin.tar.gz— Uncompresses thegzipfile and extracts thetararchive contents tonifi-toolkit-1.11.4/
-
-
Optionally, move the folders to a more appropriate location.
Building NiFi From Source
Description |
Instructions on downloading the Apache NiFi source code and building the application locally |
Purpose |
To make the application (with potential code modifications) available to run on the specified machine (e.g. a local development environment) |
Starting Point |
Machine running modern OS |
Expected Outcome |
Latest version of Apache NiFi available to run on host with no configuration |
Estimated Duration |
10 - 35 minutes + download time |
| This guide assumes macOS 10.11.0+ but should work for any modern operating system. *nix commands are used by default, but Windows equivalents are provided where available. |
-
Go to the Apache NiFi Downloads page.
-
Download the latest version of NiFi source code via the compressed files. For example, if the latest version is 1.11.4:
-
nifi-1.11.4-source-release.zip[53 MB]
-
-
If you are directed to a mirror page, click the first link on the page to download the respective archive file.
-
Note that the
nifi-1.11.4-source-release.zipcompressed file is downloaded to yourDownloadsfolder. -
Download the GPG signature and checksums for the file. They are found on the initial download page next to the archive file.
-
gpg --verify -v nifi-1.11.4-source-release.zip.asc— Verifies the GPG signature provided on the archive by the Release Manager (RM). See NiFi GPG Guide: Verifying a Release Signature for further details -
shasum -a 256 nifi-1.11.4-source-release.zip— Calculates a SHA-256 checksum over the downloaded artifact. This should be compared with the contents ofnifi-1.11.4-source-release.zip.sha256for equality -
shasum -a 512 nifi-1.11.4-source-release.zip— Calculates a SHA-512 checksum over the downloaded artifact. This should be compared with the contents ofnifi-1.11.4-source-release.zip.sha512for equality
-
-
Extract the files from the
zipfile. This can be done by double-clicking on the file in the Finder or running the following command in the terminal.-
unzip nifi-1.11.4-source-release.zip— Uncompresses thezipfile and extracts the archive contents tonifi-1.11.4/
-
-
Optionally, move the folder to a more appropriate location.
nifi-1.11.4/ % ls -alGh total 328 drwxr-xr-x 25 alopresto staff 800B Apr 6 15:48 ./ drwxr-xr-x 8 alopresto staff 256B Apr 4 18:01 ../ drwxr-xr-x 4 alopresto staff 128B Jan 22 15:10 .github/ -rw-r--r-- 1 alopresto staff 254B Jan 22 15:10 DEPENDENCIES -rw-r--r-- 1 alopresto staff 66K Jan 22 15:10 KEYS -rw-r--r-- 1 alopresto staff 21K Jan 22 15:10 LICENSE -rw-r--r-- 1 alopresto staff 7.1K Jan 22 15:10 NOTICE -rw-r--r-- 1 alopresto staff 9.1K Jan 22 15:10 README.md -rw-r--r-- 1 alopresto staff 3.3K Jan 22 15:10 SECURITY.md drwxr-xr-x 5 alopresto staff 160B Apr 6 15:44 nifi-api/ drwxr-xr-x 8 alopresto staff 256B Apr 6 15:50 nifi-assembly/ drwxr-xr-x 5 alopresto staff 160B Apr 6 15:45 nifi-bootstrap/ drwxr-xr-x 23 alopresto staff 736B Apr 6 15:44 nifi-commons/ drwxr-xr-x 9 alopresto staff 288B Apr 6 15:44 nifi-docker/ drwxr-xr-x 7 alopresto staff 224B Apr 6 15:44 nifi-docs/ drwxr-xr-x 8 alopresto staff 256B Apr 6 15:44 nifi-external/ drwxr-xr-x 5 alopresto staff 160B Apr 6 15:44 nifi-framework-api/ drwxr-xr-x 6 alopresto staff 192B Apr 6 15:44 nifi-maven-archetypes/ drwxr-xr-x 5 alopresto staff 160B Apr 6 15:45 nifi-mock/ drwxr-xr-x 82 alopresto staff 2.6K Apr 6 15:44 nifi-nar-bundles/ drwxr-xr-x 7 alopresto staff 224B Apr 6 15:44 nifi-system-tests/ drwxr-xr-x 14 alopresto staff 448B Apr 6 15:44 nifi-toolkit/ -rw-r--r-- 1 alopresto staff 44K Jan 22 15:10 pom.xml -
Build the NiFi source using Apache Maven from the source root directory (
nifi-1.11.4/) using one of the following commands. For more information, see the NiFi Contributor Guide. Estimated build times for each command on a modern professional laptop are listed below; allow additional time for dependency library downloads on first build.-
mvn clean install -Pinclude-grpc— Builds the application (expected time ~30 minutes) -
mvn clean install -T2.0C— Builds the application with multiple parallel threads (expected time ~15 minutes) -
mvn clean install -T2.0C -DskipTests— Builds the application with multiple parallel threads and unit tests disabled (expected time ~6 minutes)nifi-1.11.4/ % mvn clean install -T2.0C -DskipTests ... ------------------------------------------------------------------------ Reactor Summary for nifi 1.11.4: nifi ............................................... SUCCESS [ 0.834 s] nifi-api ........................................... SUCCESS [ 8.799 s] nifi-framework-api ................................. SUCCESS [ 12.020 s] nifi-commons ....................................... SUCCESS [ 0.253 s] nifi-utils ......................................... SUCCESS [ 16.029 s] nifi-properties .................................... SUCCESS [ 6.863 s] nifi-security-utils ................................ SUCCESS [ 14.682 s] nifi-nar-bundles ................................... SUCCESS [ 0.279 s] nifi-framework-bundle .............................. SUCCESS [ 0.358 s] nifi-framework ..................................... SUCCESS [ 1.538 s] nifi-properties-loader ............................. SUCCESS [ 14.153 s] ... nifi-system-test-suite ............................. SUCCESS [ 3.999 s] ------------------------------------------------------------------------ BUILD SUCCESS ------------------------------------------------------------------------ Total time: 06:17 min (Wall Clock) Finished at: 2020-04-06T15:50:35-07:00 ------------------------------------------------------------------------
-
-
The resulting application is available in the build directory (for 1.11.14:
nifi-assembly/target/nifi-1.11.4-bin/nifi-1.11.4).-
cd nifi-assembly/target/nifi-1.11.4-bin/nifi-1.11.4— Changes directory to the application root directorynifi-1.11.4/nifi-assembly/target/nifi-1.11.4-bin/nifi-1.11.4/ % ls -alGh drwxr-xr-x 10 alopresto staff 320B Apr 6 15:50 ./ drwxr-xr-x 3 alopresto staff 96B Apr 6 15:50 ../ -rw-r--r-- 1 alopresto staff 157K Jan 22 07:10 LICENSE -rw-r--r-- 1 alopresto staff 85K Jan 22 07:10 NOTICE -rw-r--r-- 1 alopresto staff 4.7K Jan 22 07:10 README drwxr-xr-x 8 alopresto staff 256B Apr 6 15:50 bin/ drwxr-xr-x 10 alopresto staff 320B Apr 6 15:50 conf/ drwxr-xr-x 3 alopresto staff 96B Apr 6 15:50 docs/ drwxr-xr-x 2 alopresto staff 64B Jan 22 07:10 extensions/ drwxr-xr-x 116 alopresto staff 3.6K Apr 6 15:50 lib/
-
Starting NiFi
Description |
Instructions on running the Apache NiFi application |
Purpose |
To configure and run the application on the local machine |
Starting Point |
|
Expected Outcome |
Latest version of Apache NiFi running on host with minimal configuration |
Estimated Duration |
1 minute |
-
Start in the directory where NiFi was downloaded and unarchived or built. For this section, the directory
/etc/nifi-1.11.4will be used. This directory will be referred to as the "NiFi home directory" and can be set explicitly (this is not done automatically by NiFi nor is it required).-
export NIFI_HOME="/etc/nifi-1.11.4/"— Sets an environment variable ($NIFI_HOME) which references the installation directory (optional) -
cd /etc/nifi-1.11.4— Changes the terminal to the NiFi home directory -
ls -alGh— Lists the contents of the directory (optional)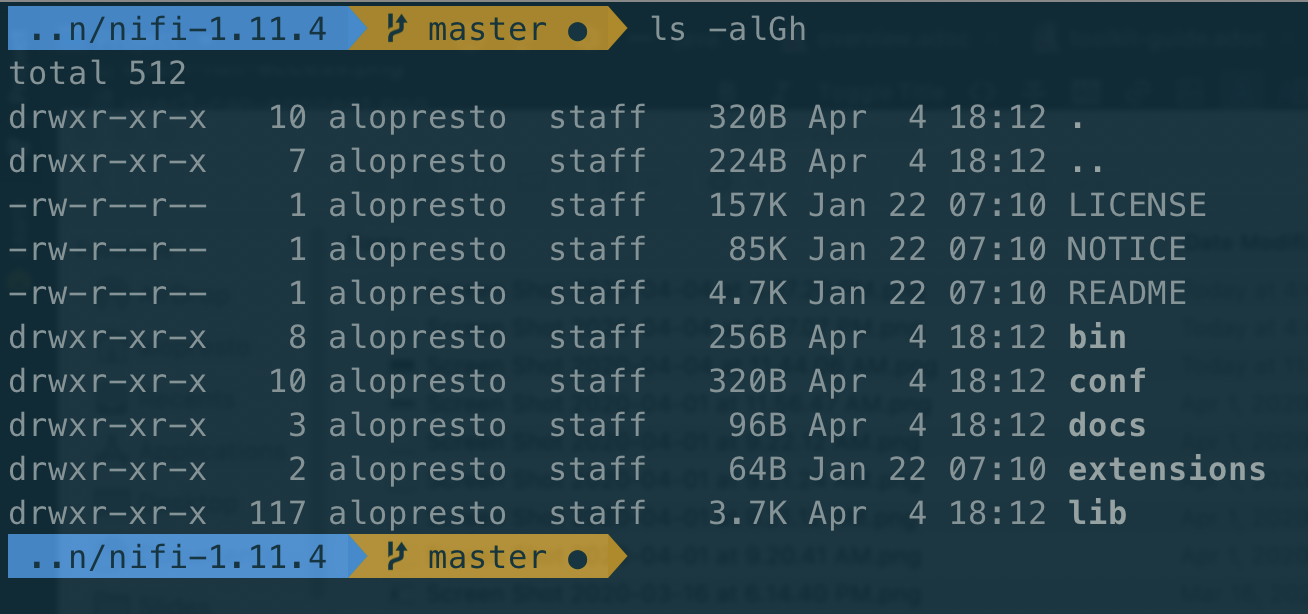
-
-
At this point, NiFi can be started with default configuration values (available at
http://localhost:8080/nifi).-
./bin/nifi.sh start— Starts NiFi. (It takes some time for NiFi to finish scheduling all components. Issuingbin/nifi.sh startexecutes thenifi.shscript that starts NiFi in the background and then exits. If you wantnifi.shto wait for NiFi to finish scheduling all components before exiting, use the--wait-for-initflag with an optional timeout specified in seconds:bin/nifi.sh start --wait-for-init 120. If the timeout is not provided, the default timeout of 15 minutes will be used.) -
tail -f logs/nifi-app.log— Tails the application log which will indicate when the application has started
-
-
Navigate to the URL in a web browser (
http://localhost:8080/nifior any listed in thenifi-app.logoutput).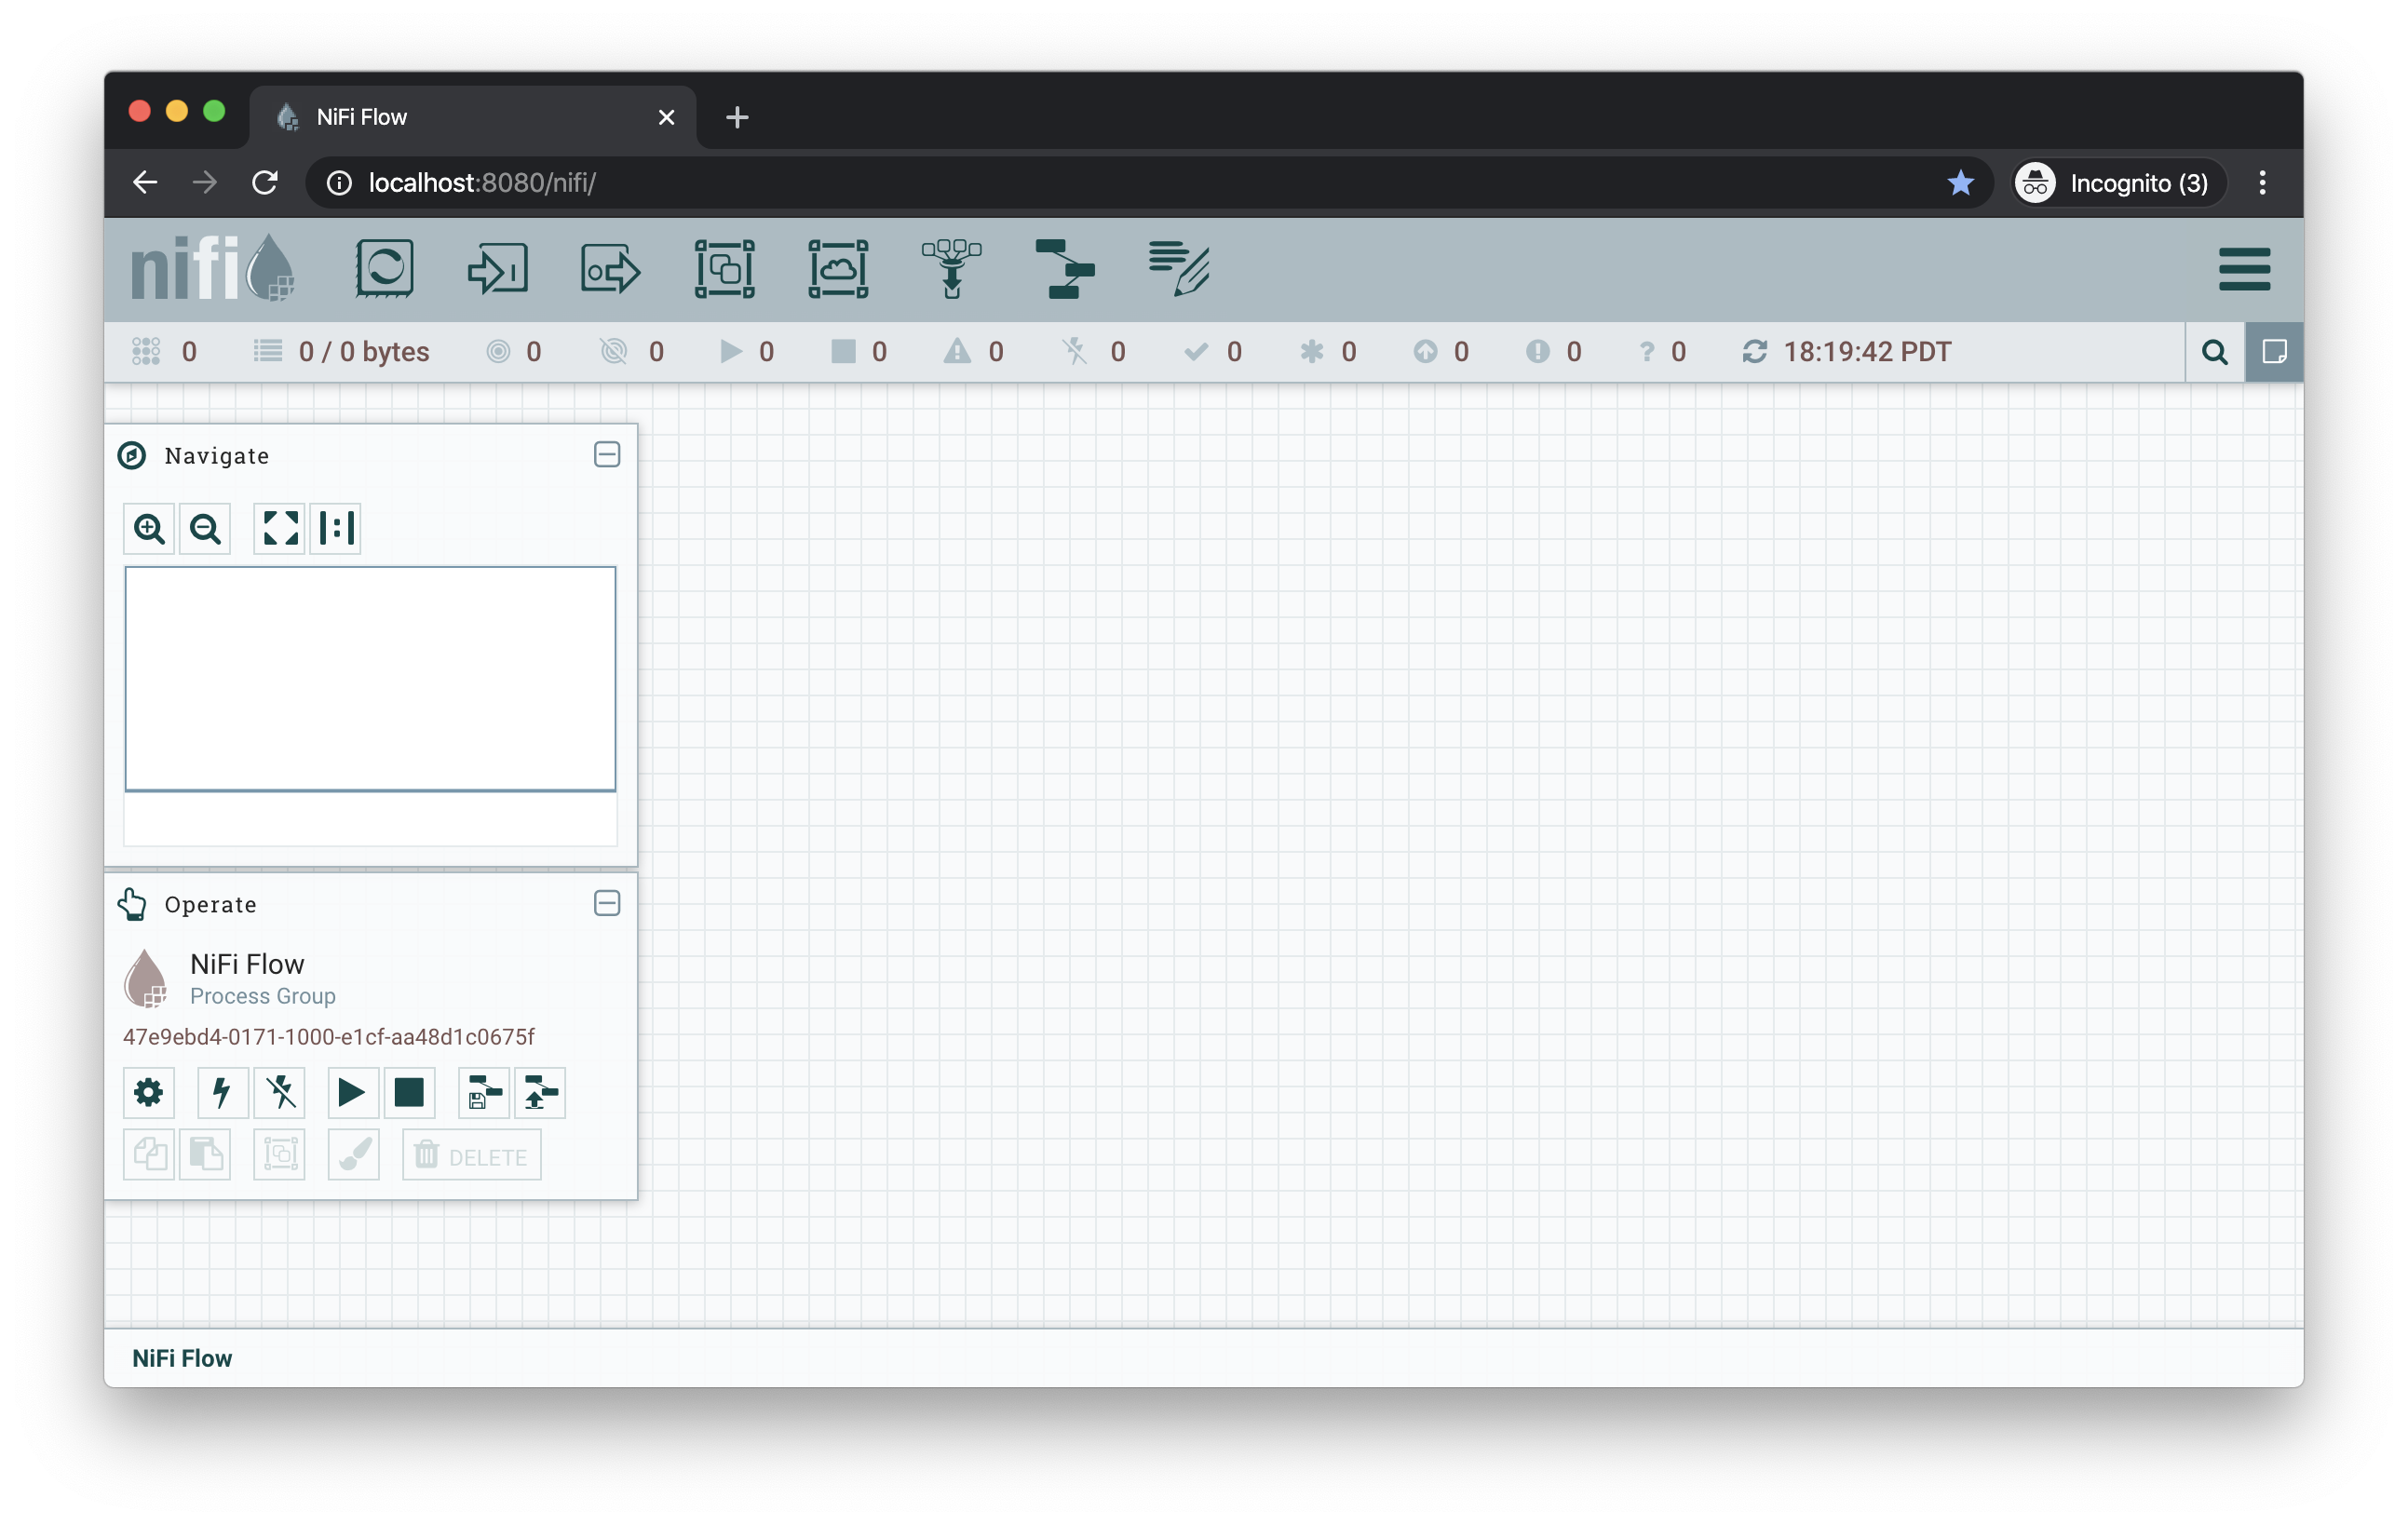
Modification of Configuration Values
Many web applications run on :8080 by default, so this port may already be occupied on the machine. This section will demonstrate changing the port used by NiFi. All of the following commands are run from $NIFI_HOME.
-
Ensure the application is not running.
-
ps -ef | grep nifi— Checks the running system for any processes referencingnifi(optional) -
./bin/nifi.sh status— Determines if the specified instance is running (optional) -
./bin/nifi.sh stop— Stops the specified instance
-
-
Open the main configuration file for NiFi (
nifi.properties). Any text editor is sufficient for this (Sublime Text, Atom, vi, nano, etc.)-
$EDITOR conf/nifi.properties— Opens thenifi.propertiesfile for editing
-
-
Change
nifi.web.http.port=8080→nifi.web.http.port=7777— Sets the HTTP port to a new valueSetting a port between 1 - 1024 requires rootaccess on *nix systems -
Save and close the file.
-
Start NiFi again
-
./bin/nifi.sh start— Starts NiFi -
tail -f logs/nifi-app.log— Tails the application log
-
-
Open a web browser to the new address (
http://localhost:7777/nifi)
Securing NiFi with TLS
Apache NiFi requires Transport Layer Security (TLS) configuration for multiple reasons.
-
To encrypt communication between clients and server (this provides confidentialty and integrity over transmitted data)
-
To prevent malicious users from intercepting data or impersonating the server
-
To enable any authentication & authorization mechanisms
NiFi intentionally does not allow any authentication or authorization features over plaintext HTTP. Without the confidentiality and integrity provided by TLS and the user & group access controls, any malicious entity can intercept and modify NiFi API requests, corrupt and steal data, and otherwise interfere with the NiFi instance. Because of NiFi’s robust feature set, this can even lead to complete control over the host running NiFi. For more information, see Administrator’s Guide: Security Configuration.
Securing NiFi with TLS Toolkit
| This section assumes no enterprise IT department to provide signed certificates. For a scenario with provided certificates, see Securing NiFi with Provided Certificates. |
Description |
Instructions on enabling Transport Layer Security (TLS) for the Apache NiFi application using the TLS Toolkit |
Purpose |
Securing NiFi with TLS protects data in motion and is required to enable authentication & authorization |
Starting Point |
|
Expected Outcome |
Latest version of Apache NiFi running on host over TLS with client certificate authentication and authorization enabled and a single configured user |
Estimated Duration |
10 minutes |
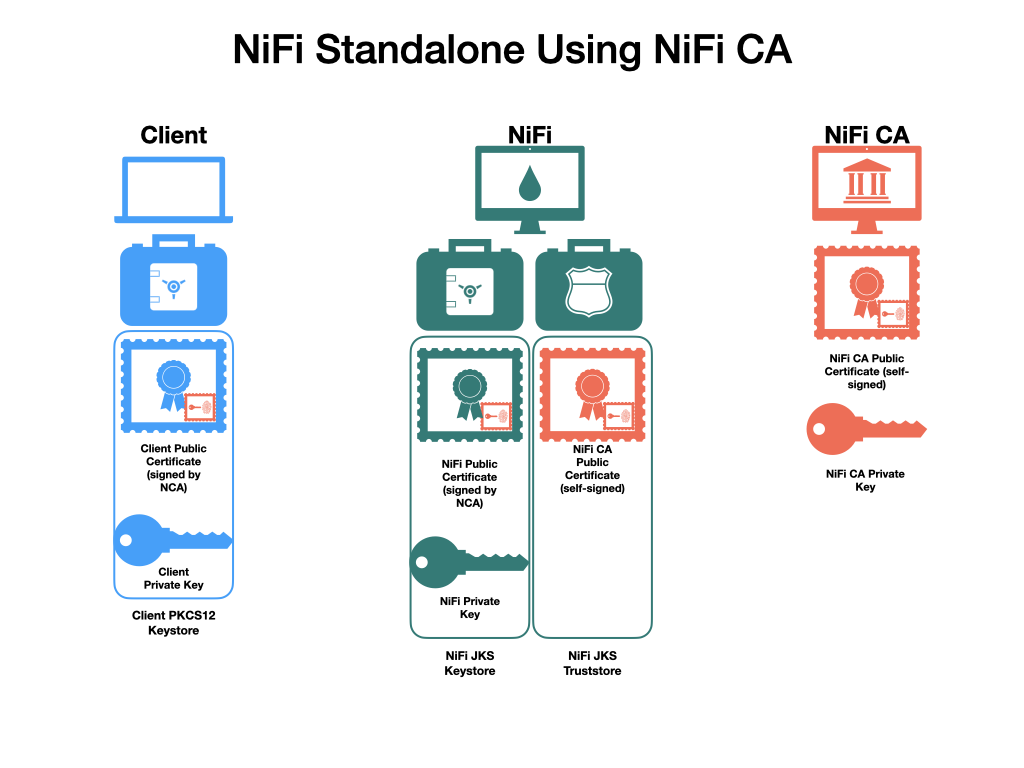
Apache NiFi provides a toolkit (a collection of command-line tools for system administration). One of these is the TLS Toolkit, which provides a self-signed Certificate Authority (CA) and can easily issue and sign certificates in the format expected by NiFi. The toolkit can be run by a user or scripted to perform automated certificate generation. For more information, see NiFi Toolkit Guide: TLS Toolkit.
The end result will consist of a self-signed NiFi CA (the root), a keystore and truststore containing the necessary certificates for the NiFi instance to operate, and a client certificate for a human user to access NiFi.
-
Start in the directory where the NiFi toolkit was downloaded and unarchived. For this section, the directory
/etc/nifi-toolkit-1.11.4will be used. This directory will be referred to as the "NiFi Toolkit home directory" and can be set explicitly (this is not done automatically by NiFi Toolkit nor is it required).-
export NIFI_TOOLKIT_HOME="/etc/nifi-toolkit-1.11.4/"— Sets an environment variable ($NIFI_TOOLKIT_HOME) which references the installation directory (optional) -
cd /etc/nifi-toolkit-1.11.4— Changes the terminal to the NiFi Toolkit home directory -
ls -alGh— Lists the contents of the directory (optional)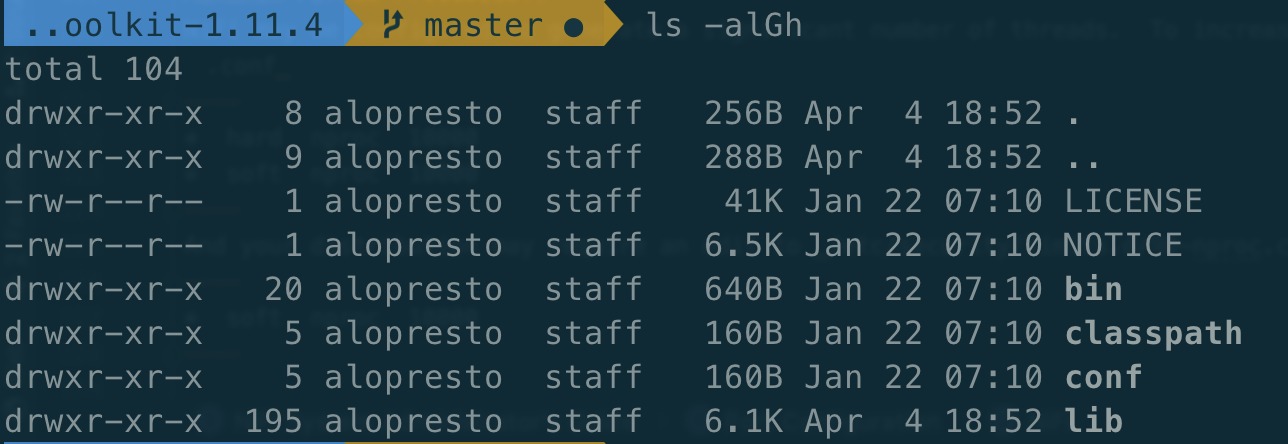
-
-
Generate the certificate and key for the NiFi instance. Running this command will first generate the NiFi CA root certificate and private key, then generate and sign the certificate for the application instance, and finally generate a pre-configured
nifi.propertiesfile.-
./bin/tls-toolkit.sh standalone -n "localhost"— Generates the signed certificate forlocalhostnifi-toolkit-1.11.4 % ./bin/tls-toolkit.sh standalone -n "localhost" 2020/04/04 19:13:29 INFO [main] org.apache.nifi.toolkit.tls.standalone.TlsToolkitStandaloneCommandLine: No nifiPropertiesFile specified, using embedded one. 2020/04/04 19:13:29 INFO [main] org.apache.nifi.toolkit.tls.standalone.TlsToolkitStandalone: Running standalone certificate generation with output directory ../nifi-toolkit-1.11.4 2020/04/04 19:13:30 INFO [main] org.apache.nifi.toolkit.tls.standalone.TlsToolkitStandalone: Generated new CA certificate ../nifi-toolkit-1.11.4/nifi-cert.pem and key ../nifi-toolkit-1.11.4/nifi-key.key 2020/04/04 19:13:30 INFO [main] org.apache.nifi.toolkit.tls.standalone.TlsToolkitStandalone: Writing new ssl configuration to ../nifi-toolkit-1.11.4/localhost 2020/04/04 19:13:30 INFO [main] org.apache.nifi.toolkit.tls.standalone.TlsToolkitStandalone: Successfully generated TLS configuration for localhost 1 in ../nifi-toolkit-1.11.4/localhost 2020/04/04 19:13:30 INFO [main] org.apache.nifi.toolkit.tls.standalone.TlsToolkitStandalone: No clientCertDn specified, not generating any client certificates. 2020/04/04 19:13:30 INFO [main] org.apache.nifi.toolkit.tls.standalone.TlsToolkitStandalone: tls-toolkit standalone completed successfully
-
-
The toolkit has created three files in the
localhostdirectory:keystore.jks,truststore.jks, andnifi.properties. To see what was automatically populated innifi.properties, compare it to the default file in the NiFi instance.-
diff /etc/nifi-1.11.4/conf/nifi.properties localhost/nifi.properties— Compares the original configuration with the newly-generated onenifi-toolkit-1.11.4 % diff ../nifi-1.11.4/conf/nifi.properties localhost/nifi.properties 135,137c135,137 < nifi.remote.input.host= < nifi.remote.input.secure=false < nifi.remote.input.socket.port= --- > nifi.remote.input.host=localhost > nifi.remote.input.secure=true > nifi.remote.input.socket.port=10443 145c145 < nifi.web.http.port=8080 --- > nifi.web.http.port= 147,148c147,148 < nifi.web.https.host= < nifi.web.https.port= --- > nifi.web.https.host=localhost > nifi.web.https.port=9443 163,169c163,169 < nifi.security.keystore= < nifi.security.keystoreType= < nifi.security.keystorePasswd= < nifi.security.keyPasswd= < nifi.security.truststore= < nifi.security.truststoreType= < nifi.security.truststorePasswd= --- > nifi.security.keystore=./conf/keystore.jks > nifi.security.keystoreType=jks > nifi.security.keystorePasswd=aCeVndQ8JxIi9kLoz9YS65RClHPxB516tmIA/n26b54 > nifi.security.keyPasswd=aCeVndQ8JxIi9kLoz9YS65RClHPxB516tmIA/n26b54 > nifi.security.truststore=./conf/truststore.jks > nifi.security.truststoreType=jks > nifi.security.truststorePasswd=hbuVighksEPIxl6iGl1WFCIrFqdb65KZuamj72J7Yp8 213c213 < nifi.cluster.protocol.is.secure=false --- > nifi.cluster.protocol.is.secure=true 217,218c217,218 < nifi.cluster.node.address= < nifi.cluster.node.protocol.port= --- > nifi.cluster.node.address=localhost > nifi.cluster.node.protocol.port=11443The
nifi.remotesection configures Site to Site connections. Thenifi.websection disables the plaintext HTTP connector and enables an HTTPS connector atlocalhost:9443(the default HTTPS port for NiFi). Thenifi.securitysection populates the paths to the keystore and truststore and randomly-generated passwords for each. Thenifi.clustersection configures the cluster communication protocol (not used in a standalone instance).
-
-
Copy the contents of the
localhostdirectory to theconf/directory in the location of the NiFi installation. This command will overwrite any existingnifi.propertiesfile or keystore/truststore present in the destination.-
cp -rv ./localhost/* /etc/nifi-1.11.4/conf/.— Copies the generated files into the NiFi instance
-
-
Generate the user’s client certificate to authenticate to NiFi. The toolkit will create the certificate and sign it with the same NiFi CA certificate used for the NiFi server certificate. Because the NiFi truststore includes this public certificate, it will trust the client certificate and allow it to authenticate.
-
./bin/tls-toolkit.sh standalone -C "CN=my_username, OU=NiFi"— Generates and signs the client certificatenifi-toolkit-1.11.4 % ./bin/tls-toolkit.sh standalone -C "CN=my_username, OU=NiFi" 2020/04/04 19:38:30 INFO [main] org.apache.nifi.toolkit.tls.standalone.TlsToolkitStandaloneCommandLine: No nifiPropertiesFile specified, using embedded one. 2020/04/04 19:38:30 INFO [main] org.apache.nifi.toolkit.tls.standalone.TlsToolkitStandalone: Running standalone certificate generation with output directory ../nifi-toolkit-1.11.4 2020/04/04 19:38:30 INFO [main] org.apache.nifi.toolkit.tls.util.TlsHelper: Verifying the certificate signature for CN=localhost,OU=NIFI 2020/04/04 19:38:30 INFO [main] org.apache.nifi.toolkit.tls.util.TlsHelper: Attempting to verify certificate CN=localhost,OU=NIFI signature with CN=localhost,OU=NIFI 2020/04/04 19:38:30 INFO [main] org.apache.nifi.toolkit.tls.util.TlsHelper: Certificate was signed by CN=localhost,OU=NIFI 2020/04/04 19:38:30 INFO [main] org.apache.nifi.toolkit.tls.standalone.TlsToolkitStandalone: Using existing CA certificate ../nifi-toolkit-1.11.4/nifi-cert.pem and key ../nifi-toolkit-1.11.4/nifi-key.key 2020/04/04 19:38:30 INFO [main] org.apache.nifi.toolkit.tls.standalone.TlsToolkitStandalone: No hostnames specified, not generating any host certificates or configuration. 2020/04/04 19:38:30 INFO [main] org.apache.nifi.toolkit.tls.standalone.TlsToolkitStandalone: Generating new client certificate ../nifi-toolkit-1.11.4/CN=my_username_OU=NiFi.p12 2020/04/04 19:38:31 INFO [main] org.apache.nifi.toolkit.tls.standalone.TlsToolkitStandalone: Successfully generated client certificate ../nifi-toolkit-1.11.4/CN=my_username_OU=NiFi.p12 2020/04/04 19:38:31 INFO [main] org.apache.nifi.toolkit.tls.standalone.TlsToolkitStandalone: tls-toolkit standalone completed successfully
-
-
Load the client certificate into the web browser. Some browsers (e.g. Mozilla Firefox) maintain their own internal keychain separate from the operating system’s (OS). Others (e.g. Apple Safari, Google Chrome) rely on the OS keychain. On most modern OS, double-clicking the PKCS12 keystore (
CN=my_username_OU=NiFi.p12) will open it with the default handler and load it into the OS keychain. The randomly-generated password is available inCN=my_username_OU=NiFi.password. -
Populate the Initial Admin Identity in NiFi. This is the identity that will be allowed to access the NiFi instance and configure user and group access via the UI or API.
-
$EDITOR /etc/nifi-1.11.4/conf/authorizers.xml— Opens theauthorizers.xmlfile in the text editor. -
Replace
<property name="Initial User Identity 1"></property>in theuserGroupProvidersection with<property name="Initial User Identity 1">CN=my_username, OU=NiFi</property>containing the full Distinguished Name (DN) as provided to the TLS Toolkit in the previous step -
Replace
<property name="Initial Admin Identity"></property>in theaccessPolicyProvidersection with<property name="Initial Admin Identity">CN=my_username, OU=NiFi</property>containing the full Distinguished Name (DN) as provided to the TLS Toolkit in the previous stepThis is a frequent problem area when configuring security for NiFi. The DN must match exactly to be authenticated. Check capitalization and whitespace especially.
-
-
Start NiFi with the new configuration.
-
cd /etc/nifi-1.11.4/— Changes to the NiFi home directory -
./bin/nifi.sh start— Starts NiFi -
tail -f logs/nifi-app.log— Tails the application logNote that there are now log entries about the keystore and truststore being loaded and the available URLs are HTTPS.
2020-04-04 19:52:01,122 INFO [main] o.e.jetty.server.handler.ContextHandler Started o.e.j.w.WebAppContext@623ebac7{nifi-error,/,file:///Users/alopresto/Workspace/scratch/release_verification/nifi-1.11.4-bin/nifi-1.11.4/work/jetty/nifi-web-error-1.11.4.war/webapp/,AVAILABLE}{./work/nar/framework/nifi-framework-nar-1.11.4.nar-unpacked/NAR-INF/bundled-dependencies/nifi-web-error-1.11.4.war}
2020-04-04 19:52:01,155 INFO [main] o.e.jetty.util.ssl.SslContextFactory x509=X509@b96fb73(nifi-key,h=[localhost],w=[]) for SslContextFactory@5edd911f[provider=null,keyStore=file:///Users/alopresto/Workspace/scratch/release_verification/nifi-1.11.4-bin/nifi-1.11.4/conf/keystore.jks,trustStore=file:///Users/alopresto/Workspace/scratch/release_verification/nifi-1.11.4-bin/nifi-1.11.4/conf/truststore.jks]
2020-04-04 19:52:01,191 INFO [main] o.eclipse.jetty.server.AbstractConnector Started ServerConnector@767191b1{SSL,[ssl, http/1.1]}{localhost:9443}
2020-04-04 19:52:01,192 INFO [main] org.eclipse.jetty.server.Server Started @24336ms
2020-04-04 19:52:01,215 INFO [main] org.apache.nifi.nar.NarAutoLoader Starting NAR Auto-Loader for directory ./extensions ...
2020-04-04 19:52:01,216 INFO [main] org.apache.nifi.nar.NarAutoLoader NAR Auto-Loader started
2020-04-04 19:52:01,216 INFO [main] org.apache.nifi.web.server.JettyServer NiFi has started. The UI is available at the following URLs:
2020-04-04 19:52:01,216 INFO [main] org.apache.nifi.web.server.JettyServer https://localhost:9443/nifi
2020-04-04 19:52:01,218 INFO [main] org.apache.nifi.BootstrapListener Successfully initiated communication with Bootstrap
2020-04-04 19:52:01,219 INFO [main] org.apache.nifi.NiFi Controller initialization took 16457023826 nanoseconds (16 seconds).
-
-
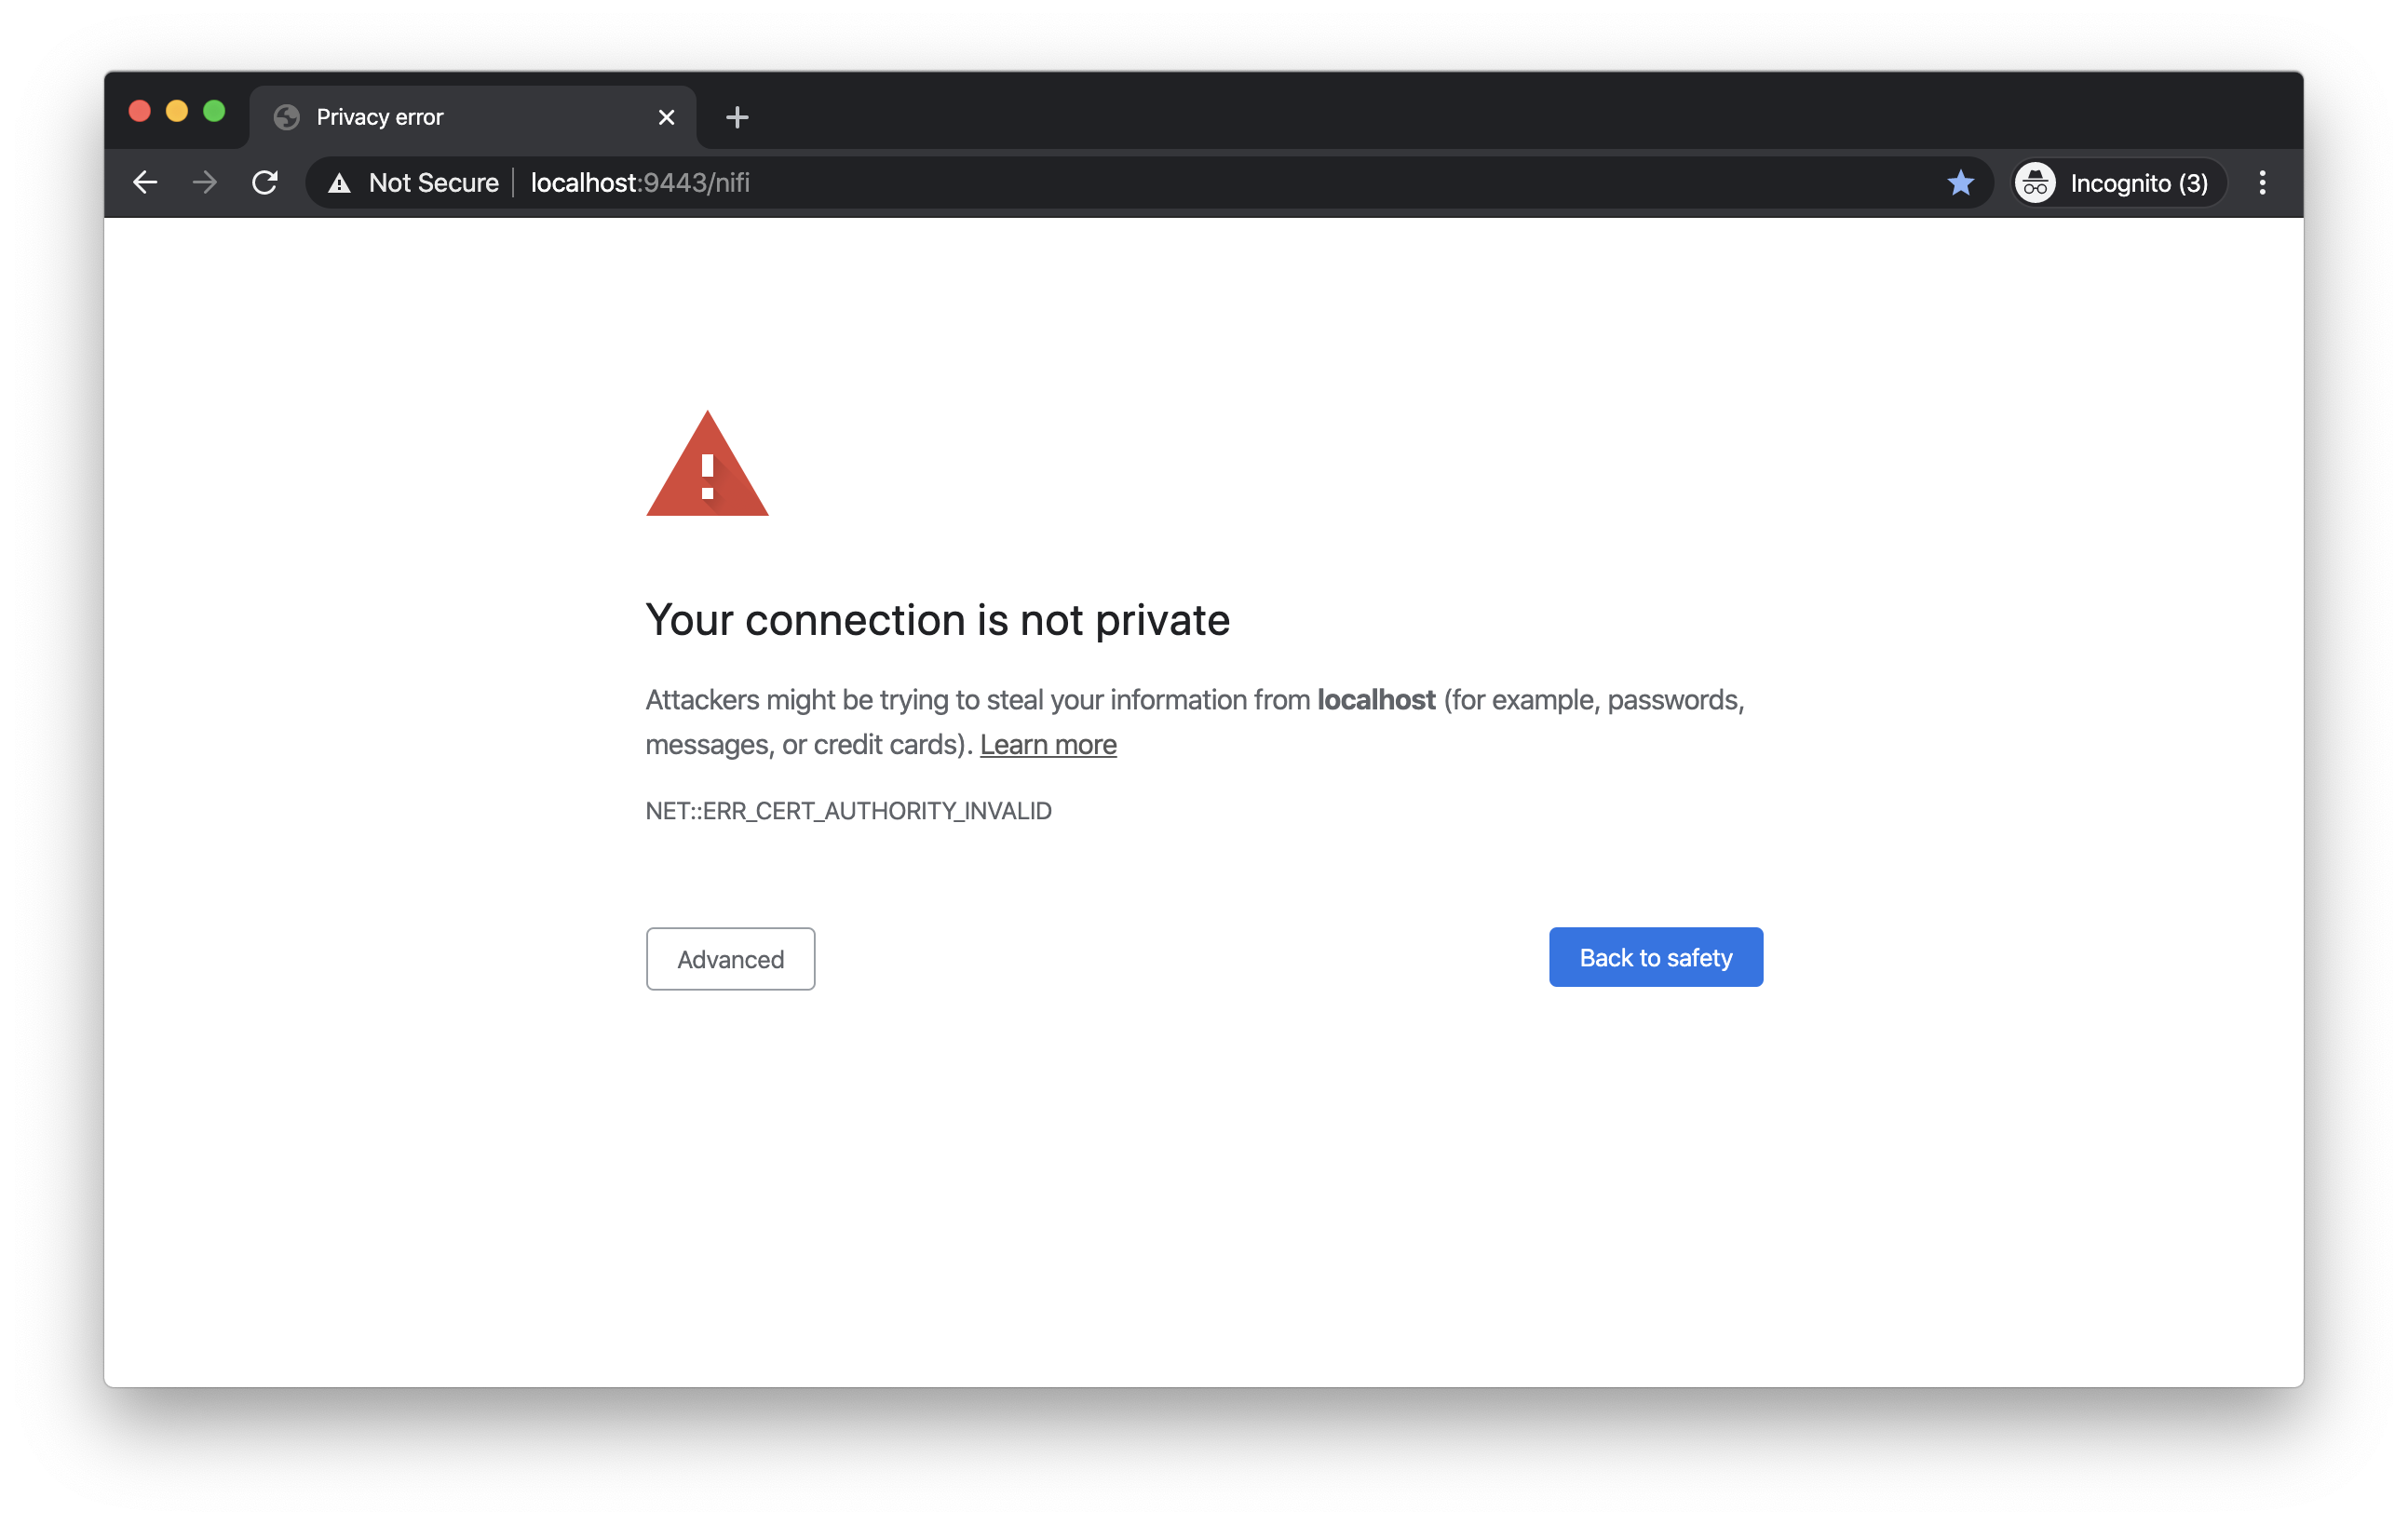
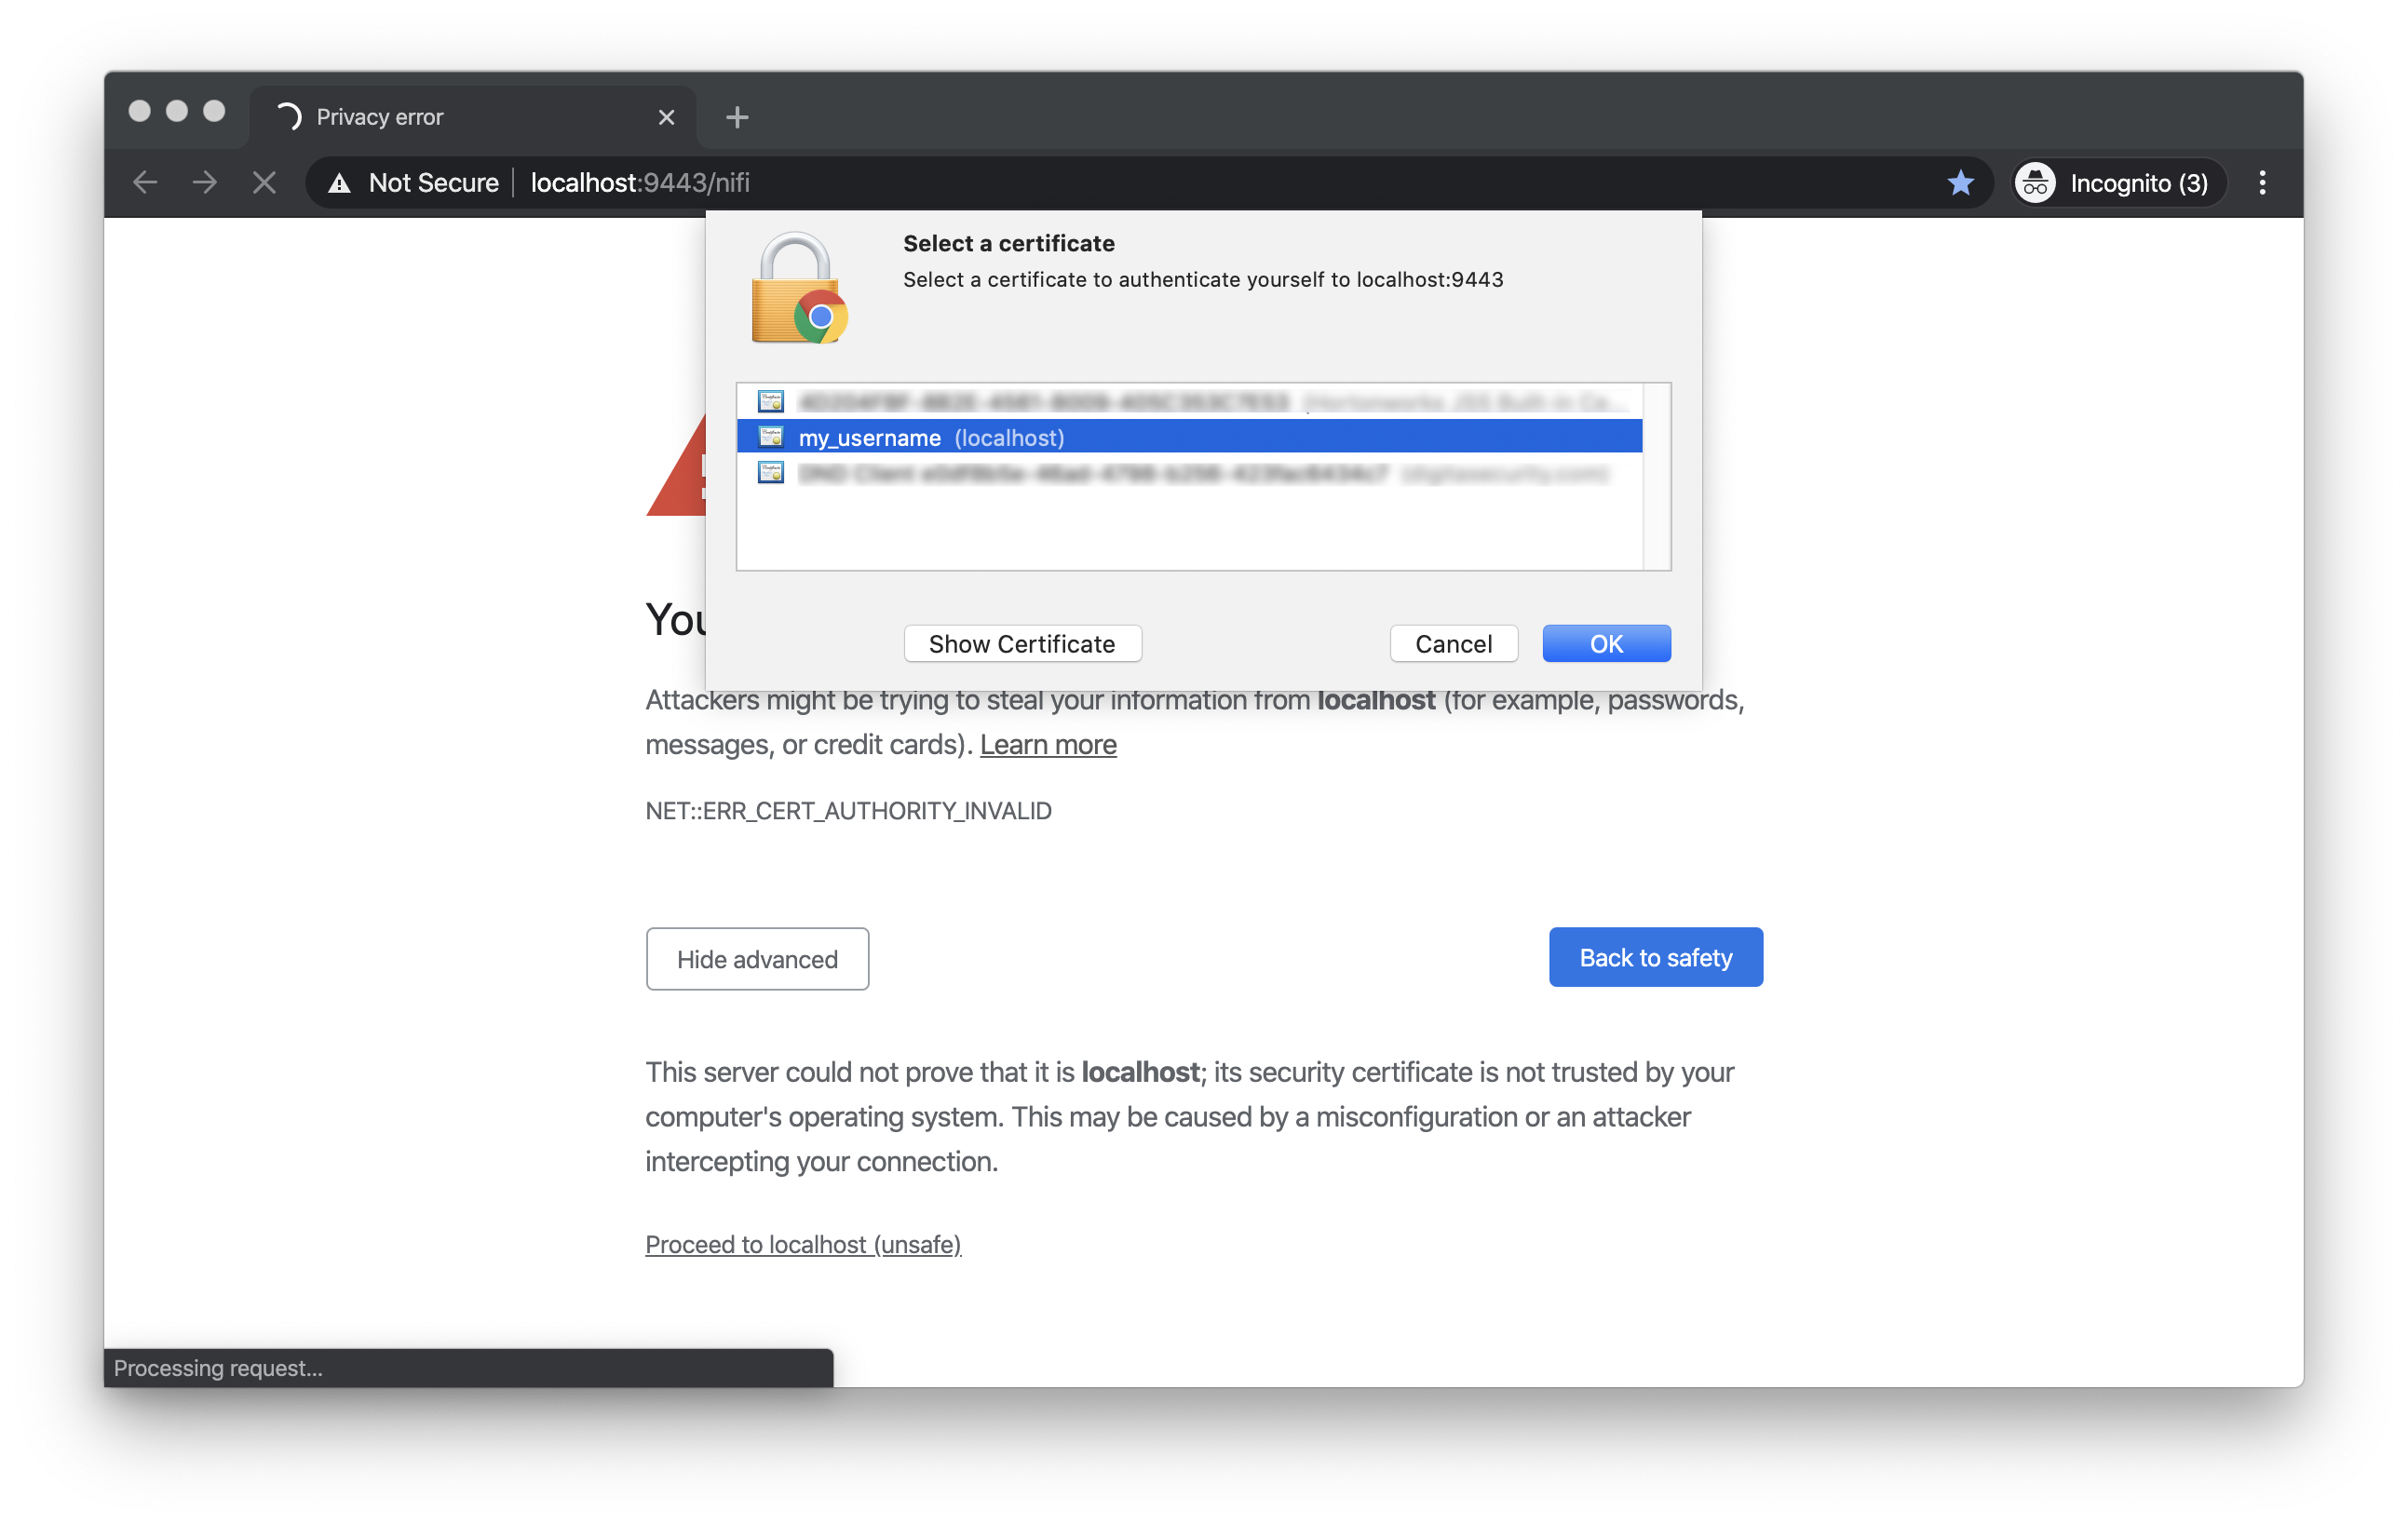
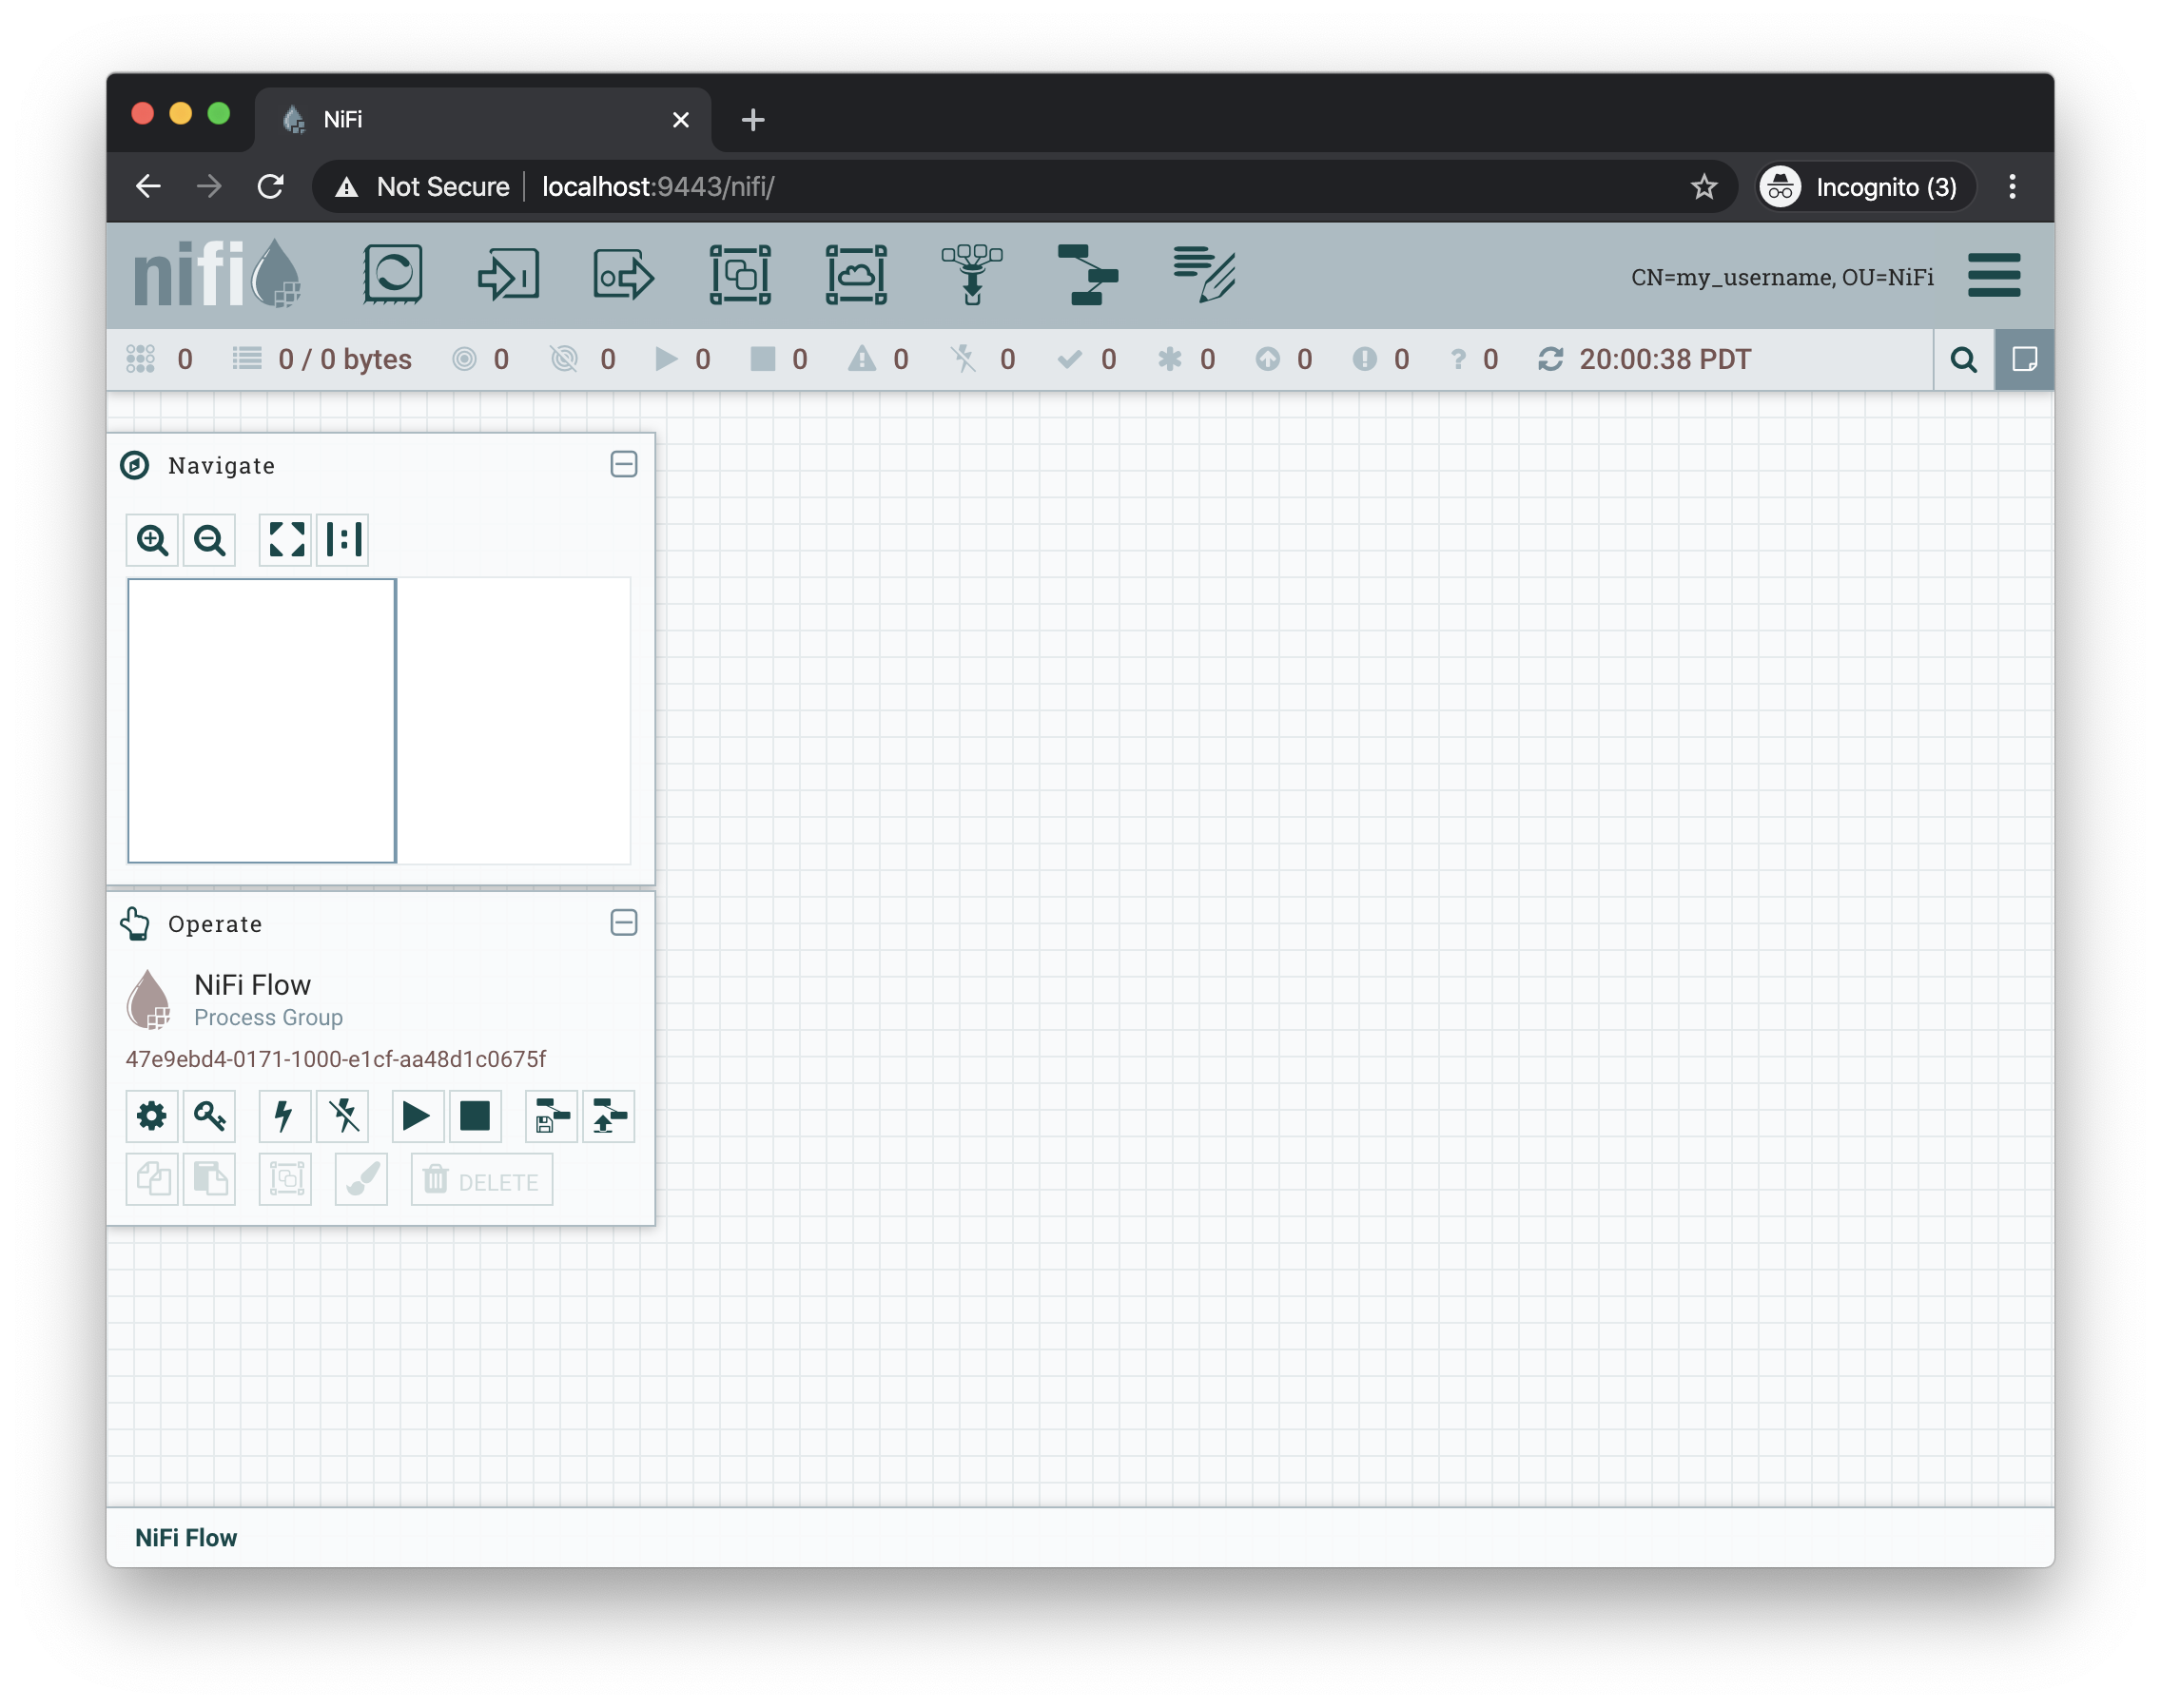
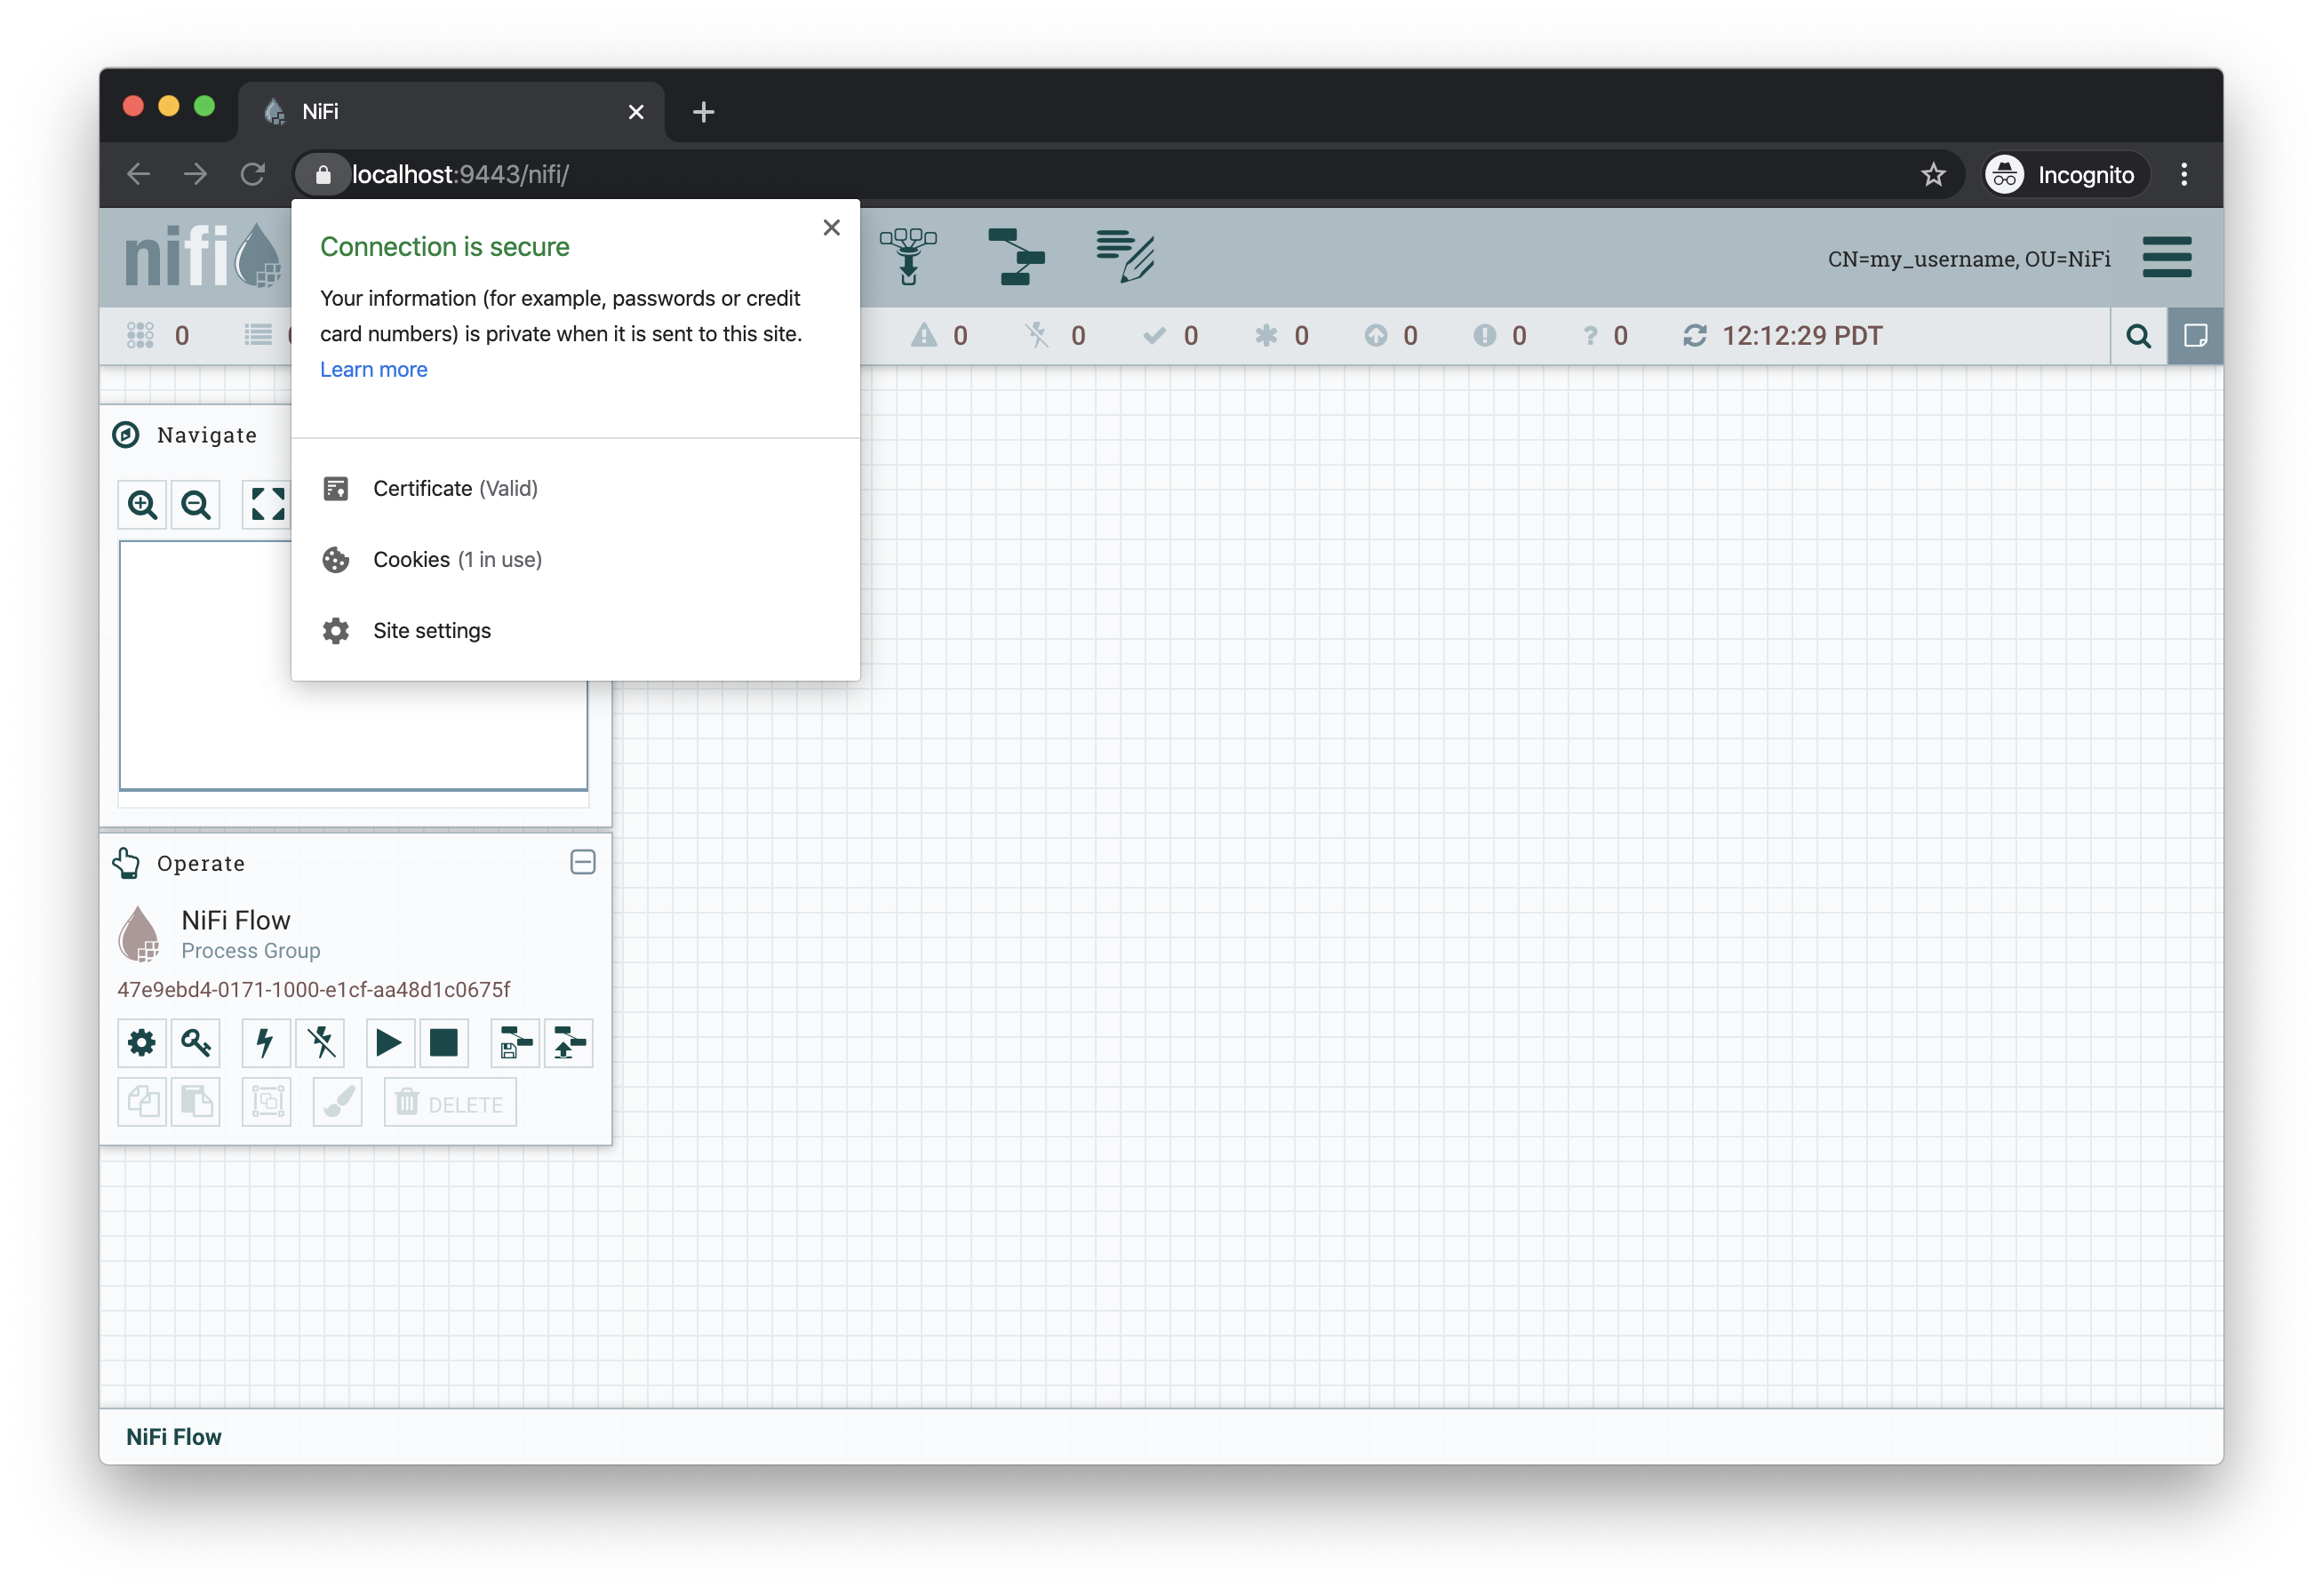
Open the web browser to
https://localhost:9443/nifi. The browser will present a warning that the site you are attempting to visit is insecure because the NiFi certificate is not signed by a trusted CA. Make an exception and acknowledge the risk (all communications are still encrypted even if the browser does not recognize the certificate). The browser may prompt to select the client certificate you wish to present to NiFi. Choose the entry forCN=my_usernamegenerated by the toolkit.The browser warning of an insecure server certificate
The browser prompting for a client certificate to present
The application running. Note the user’s DN in the top-right corner
Additional Notes
-
While it is recommended to configure NiFi with security immediately, some admins have already run NiFi with other configuration modifications before securing it. The TLS Toolkit provides an option to consume an existing
nifi.propertiesfile and make the security changes to it rather than using a default template. Use-f /etc/nifi-1.11.4/conf/nifi.propertiesor--nifiPropertiesFile /etc/nifi-1.11.4/conf/nifi.propertiesif this file already exists. For more toolkit options, see NiFi Toolkit Guide: TLS Toolkit Operation Modes. -
To generate a certificate for a hostname other than
localhost, use the-n somehost.comargument. To run on the local machine, DNS settings must allow for this. Either modify the/etc/hostsfile or use a tool like dnsmasq to set up custom DNS routing. This is beyond the scope of this document. -
The browser will warn about an insecure connection because it does not trust the self-signed CA certificate. To explicitly mark this certificate as trusted, follow the instructions for the relevant OS and browser combination. For example, using macOS Catalina and Google Chrome:
-
Open the NiFi CA cert in the Keychain Access app. Double-click on
nifi-cert.pemor run the following command:-
open /etc/nifi-toolkit-1.11.4/nifi-cert.pem— Opens the certificate in Keychain Access -
Right-click the
localhostcertificate and select Get Info
-
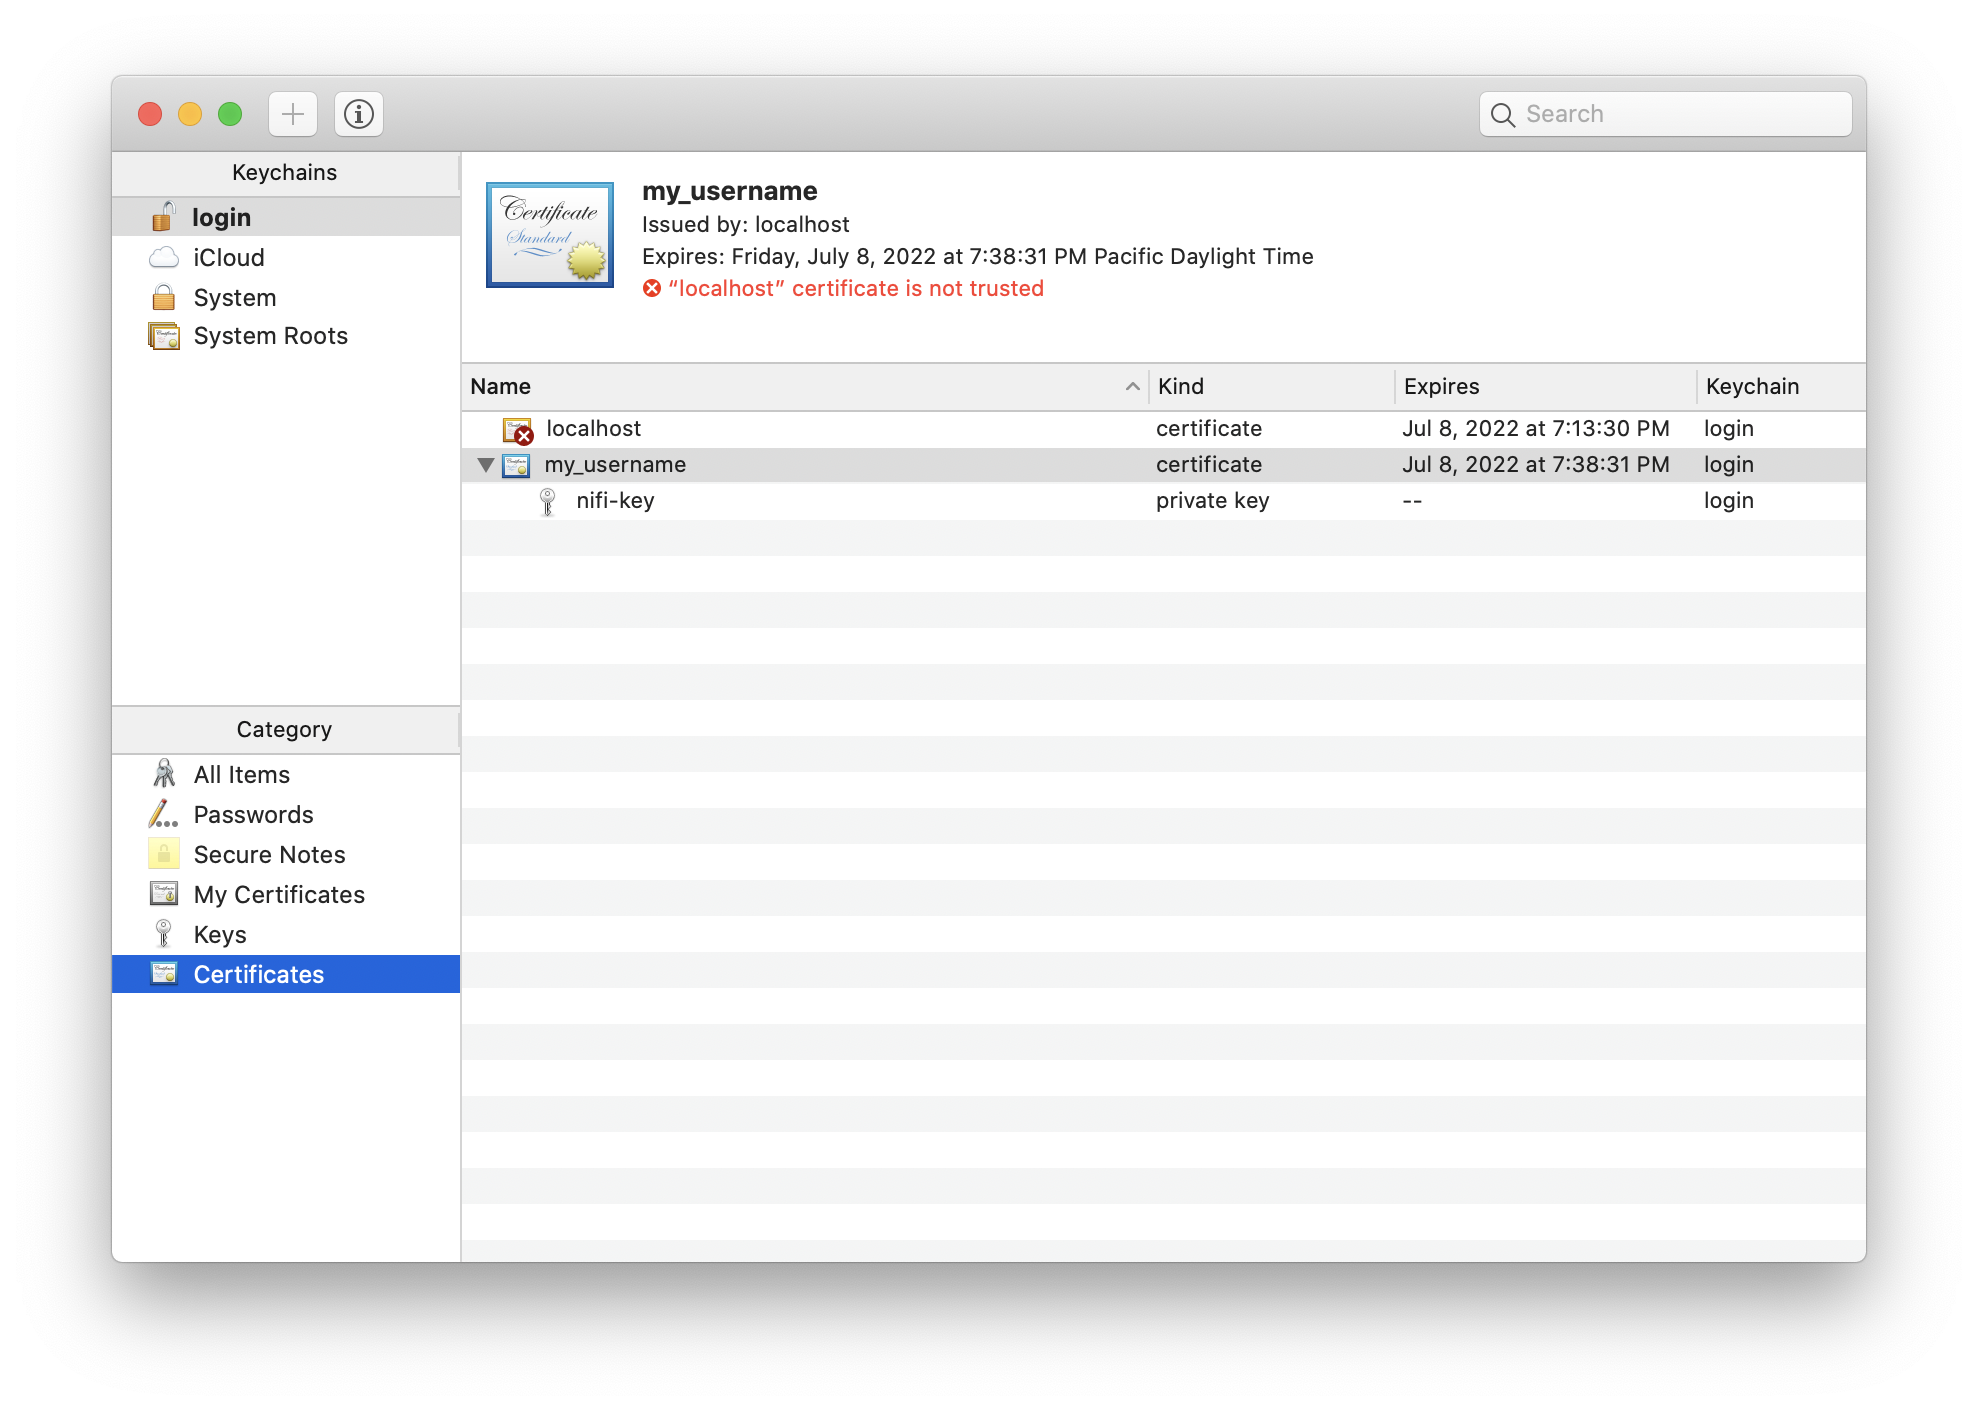
-
Expand the Trust section in the dialog
-
Change Secure Sockets Layer (SSL) to Always Trust
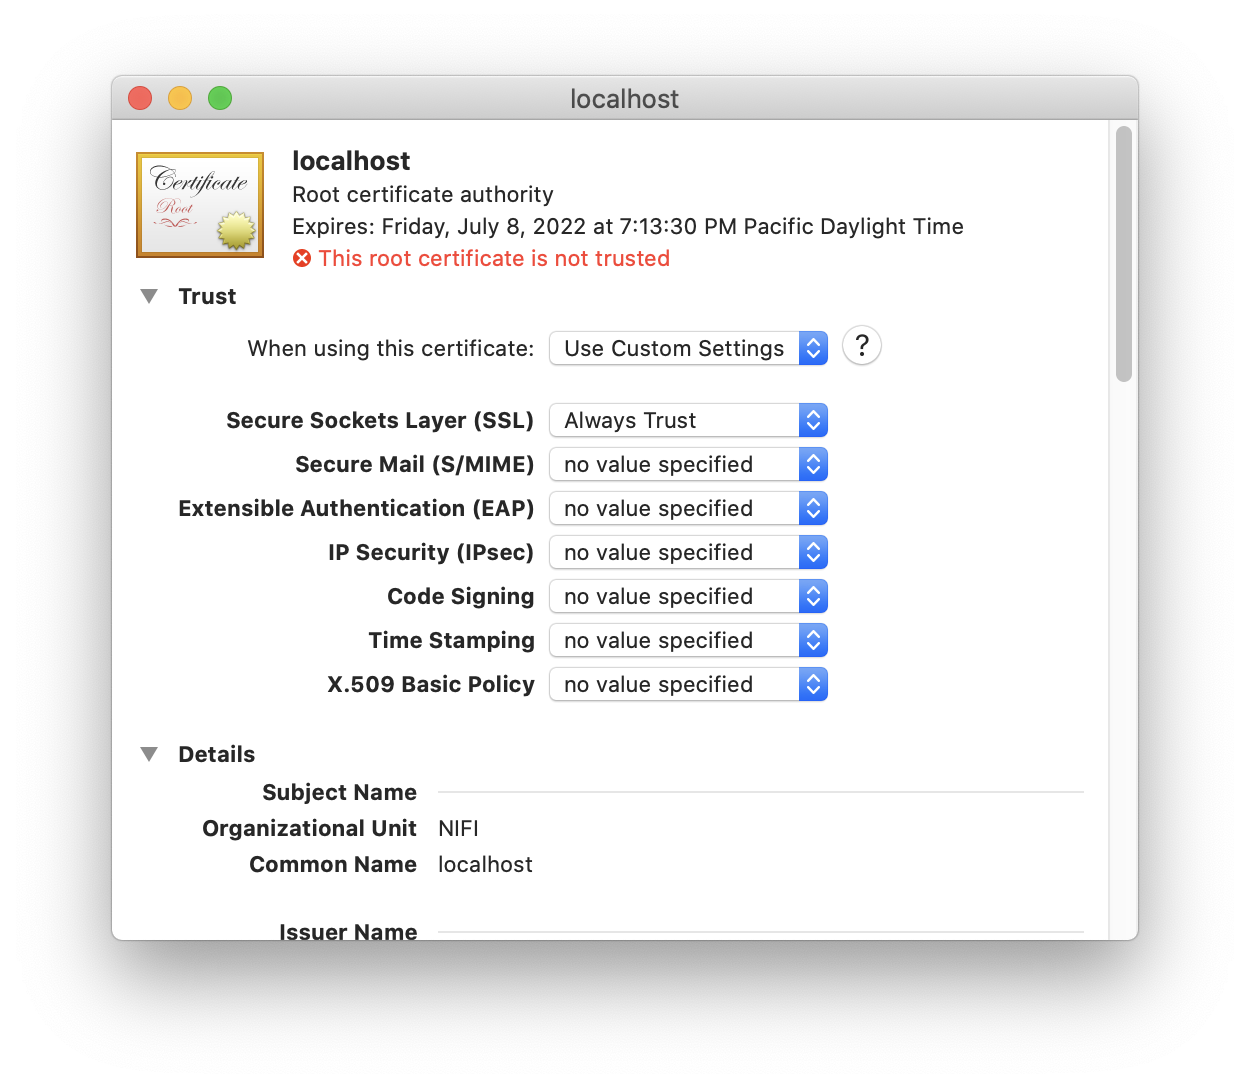
-
Close the dialog
-
Restart the browser
-
Navigate to
https://localhost:9443/nifi
-
Securing NiFi with Provided Certificates
| This section assumes an enterprise IT department or other mechanism to provide signed certificates. For a scenario with self-signed certificates, see Securing NiFi with TLS Toolkit. |
Description |
Instructions on enabling Transport Layer Security (TLS) for the Apache NiFi application using provided certificates |
Purpose |
Securing NiFi with TLS protects data in motion and is required to enable authentication & authorization |
Starting Point |
|
Expected Outcome |
Latest version of Apache NiFi running on host over TLS with client certificate authentication and authorization enabled and a single configured user |
Estimated Duration |
10 minutes |
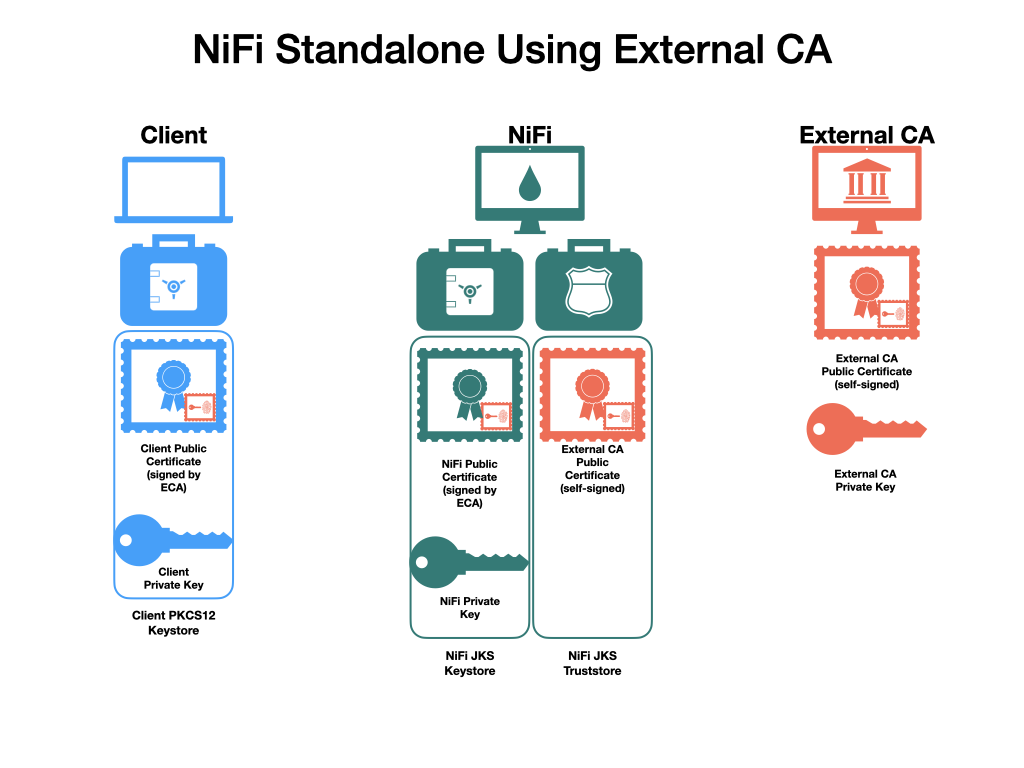
In this scenario, a commercial CA is used, but it could also be an enterprise CA with an internal CA certificate which is configured to be trusted by corporate machines. There are many commercial vendors providing signed certificates. For this example, TinyCert is used as it is free. Let’s Encrypt is another free provider, but requires verification of hostname ownership which involves additional steps not shown here.
For this scenario, all certificates and keys will be in Privacy-Enhanced Mail (PEM) format. This is a common format for certificates and keys. It uses Base64 encoding for the contents of the files, and can be transmitted across various mediums and storage mechanisms easily. Plain text editors can be used to view the contents, and the openssl and keytool tools can parse the contents.
Example PEM file:
% cat nifi.pem
-----BEGIN CERTIFICATE-----
MIIFDzCCA/egAwIBAgICURswDQYJKoZIhvcNAQELBQAwgZMxCzAJBgNVBAYTAlVT
MQswCQYDVQQIDAJDQTEVMBMGA1UEBwwMU2FudGEgTW9uaWNhMRcwFQYDVQQKDA5B
cGFjaGUgTmlGaSBDQTErMCkGA1UECwwiU2VjdXJlIERpZ2l0YWwgQ2VydGlmaWNh
dGUgU2lnbmluZzEaMBgGA1UEAwwRQXBhY2hlIE5pRmkgQ0EgQ0EwHhcNMjAwNDA1
MjI0MTQ5WhcNMjEwNDA1MjI0MTQ5WjCBgjELMAkGA1UEBhMCVVMxCzAJBgNVBAgM
AkNBMRUwEwYDVQQHDAxTYW50YSBNb25pY2ExFzAVBgNVBAoMDkFwYWNoZSBOaUZp
IENBMSAwHgYDVQQLDBdBcGFjaGUgTmlGaSBXYWxrdGhyb3VnaDEUMBIGA1UEAwwL
c2VjdXJlLm5pZmkwggEiMA0GCSqGSIb3DQEBAQUAA4IBDwAwggEKAoIBAQDJySMX
H+Fco7WbXIKQ1u1RrMd/FE7zl/69X/7Da6x4c6jlI8fy3MbxZjqFnDsJpNuIkPVv
yHcGCm8Lkw70DbCTUkW60MlVM5r4CkWhVgOd1RD34QzhgkcKjg29uOuCYa+FM78q
E5Qp64wbLpDXHpxmm4/Qv97RHdTqynqRzYs6g+VyCn14nXuqJp0533F1T2khtK4z
BrIMZj6VpWyyCFmJjmrW37GbcRuxMbtbgj+4mzD0Eew6/96R9A7Wxlq0QMuRTz12
ie9xSi/GyzQV2r9gRzxuIo8qshMIq2d/1pipIgWNj2LzEXXoEbfHy7Jwm78e1G/+
PV/ULIx+QL4h9Ni/AgMBAAGjggF6MIIBdjAJBgNVHRMEAjAAMB0GA1UdDgQWBBTy
gw/GBUrqMI80gYpdlh3NNfwrBzAfBgNVHSMEGDAWgBRkovbp8RqbD0BeDyPcrBYg
a1rzdDARBglghkgBhvhCAQEEBAMCBPAwCwYDVR0PBAQDAgP4MDsGA1UdJQQ0MDIG
CCsGAQUFBwMBBggrBgEFBQcDAgYIKwYBBQUHAwMGCCsGAQUFBwMEBggrBgEFBQcD
CDBtBggrBgEFBQcBAQRhMF8wLAYIKwYBBQUHMAGGIGh0dHA6Ly9vY3NwLnRpbnlj
ZXJ0Lm9yZy9jYS0yNDA1MC8GCCsGAQUFBzAChiNodHRwOi8vYWlhLnRpbnljZXJ0
Lm9yZy9jYS0yNDA1LmNydDA0BgNVHR8ELTArMCmgJ6AlhiNodHRwOi8vY3JsLnRp
bnljZXJ0Lm9yZy9jYS0yNDA1LmNybDAnBgNVHREEIDAeggtzZWN1cmUubmlmaYcE
fwAAAYIJbG9jYWxob3N0MA0GCSqGSIb3DQEBCwUAA4IBAQDAICxyfgm2eBa8J3+s
D2QpIQgOc8fgMYeqWwgk5rHbDk8IdkH9XloAuSzxi/weZt3PQQOdNHeeOCOXEWAf
n0X1SMGFUvLForHgArGolt9uFofvh2sE2q3/wSBI6J2940dYwZOPAlf5m7fNpcbz
WCJZGt7Pn/VWm3+uPZrMAj+GzsvR9NVMZwK/eAFM4OKNCeiLRPv1qLARYVqvLJFK
t9dlCrHKyDLIaUbG2Lcw6Yt7SBU7nAnobuYqImRRXm/bE0xwb9X9fD8UzJfmryOT
Fvz4hlntwk1fgvG1n4SrZgFNZpg1awN5tXbwiOdisTwslQ49C4QCH5iEWCM1HExL
A5GR
-----END CERTIFICATE-----
Example parsed contents:
% openssl x509 -in nifi.pem -text -noout
Certificate:
    Data:
        Version: 3 (0x2)
        Serial Number: 20763 (0x511b)
    Signature Algorithm: sha256WithRSAEncryption
        Issuer: C=US, ST=CA, L=Santa Monica, O=Apache NiFi CA, OU=Secure Digital Certificate Signing, CN=Apache NiFi CA CA
        Validity
            Not Before: Apr  5 22:41:49 2020 GMT
            Not After : Apr  5 22:41:49 2021 GMT
        Subject: C=US, ST=CA, L=Santa Monica, O=Apache NiFi CA, OU=Apache NiFi Walkthrough, CN=secure.nifi
        Subject Public Key Info:
            Public Key Algorithm: rsaEncryption
                Public-Key: (2048 bit)
                Modulus:
                    00:c9:c9:23:17:1f:e1:5c:a3:b5:9b:5c:82:90:d6:
                    ed:51:ac:c7:7f:14:4e:f3:97:fe:bd:5f:fe:c3:6b:
                    ac:78:73:a8:e5:23:c7:f2:dc:c6:f1:66:3a:85:9c:
                    3b:09:a4:db:88:90:f5:6f:c8:77:06:0a:6f:0b:93:
                    0e:f4:0d:b0:93:52:45:ba:d0:c9:55:33:9a:f8:0a:
                    45:a1:56:03:9d:d5:10:f7:e1:0c:e1:82:47:0a:8e:
                    0d:bd:b8:eb:82:61:af:85:33:bf:2a:13:94:29:eb:
                    8c:1b:2e:90:d7:1e:9c:66:9b:8f:d0:bf:de:d1:1d:
                    d4:ea:ca:7a:91:cd:8b:3a:83:e5:72:0a:7d:78:9d:
                    7b:aa:26:9d:39:df:71:75:4f:69:21:b4:ae:33:06:
                    b2:0c:66:3e:95:a5:6c:b2:08:59:89:8e:6a:d6:df:
                    b1:9b:71:1b:b1:31:bb:5b:82:3f:b8:9b:30:f4:11:
                    ec:3a:ff:de:91:f4:0e:d6:c6:5a:b4:40:cb:91:4f:
                    3d:76:89:ef:71:4a:2f:c6:cb:34:15:da:bf:60:47:
                    3c:6e:22:8f:2a:b2:13:08:ab:67:7f:d6:98:a9:22:
                    05:8d:8f:62:f3:11:75:e8:11:b7:c7:cb:b2:70:9b:
                    bf:1e:d4:6f:fe:3d:5f:d4:2c:8c:7e:40:be:21:f4:
                    d8:bf
                Exponent: 65537 (0x10001)
        X509v3 extensions:
            X509v3 Basic Constraints:
                CA:FALSE
            X509v3 Subject Key Identifier:
                F2:83:0F:C6:05:4A:EA:30:8F:34:81:8A:5D:96:1D:CD:35:FC:2B:07
            X509v3 Authority Key Identifier:
                keyid:64:A2:F6:E9:F1:1A:9B:0F:40:5E:0F:23:DC:AC:16:20:6B:5A:F3:74

            Netscape Cert Type:
                SSL Client, SSL Server, S/MIME, Object Signing
            X509v3 Key Usage:
                Digital Signature, Non Repudiation, Key Encipherment, Data Encipherment, Key Agreement
            X509v3 Extended Key Usage:
                TLS Web Server Authentication, TLS Web Client Authentication, Code Signing, E-mail Protection, Time Stamping
            Authority Information Access:
                OCSP - URI:http://ocsp.tinycert.org/ca-2405
                CA Issuers - URI:http://aia.tinycert.org/ca-2405.crt

            X509v3 CRL Distribution Points:

                Full Name:
                  URI:http://crl.tinycert.org/ca-2405.crl

            X509v3 Subject Alternative Name:
                DNS:secure.nifi, IP Address:127.0.0.1, DNS:localhost
    Signature Algorithm: sha256WithRSAEncryption
         c0:20:2c:72:7e:09:b6:78:16:bc:27:7f:ac:0f:64:29:21:08:
         0e:73:c7:e0:31:87:aa:5b:08:24:e6:b1:db:0e:4f:08:76:41:
         fd:5e:5a:00:b9:2c:f1:8b:fc:1e:66:dd:cf:41:03:9d:34:77:
         9e:38:23:97:11:60:1f:9f:45:f5:48:c1:85:52:f2:c5:a2:b1:
         e0:02:b1:a8:96:df:6e:16:87:ef:87:6b:04:da:ad:ff:c1:20:
         48:e8:9d:bd:e3:47:58:c1:93:8f:02:57:f9:9b:b7:cd:a5:c6:
         f3:58:22:59:1a:de:cf:9f:f5:56:9b:7f:ae:3d:9a:cc:02:3f:
         86:ce:cb:d1:f4:d5:4c:67:02:bf:78:01:4c:e0:e2:8d:09:e8:
         8b:44:fb:f5:a8:b0:11:61:5a:af:2c:91:4a:b7:d7:65:0a:b1:
         ca:c8:32:c8:69:46:c6:d8:b7:30:e9:8b:7b:48:15:3b:9c:09:
         e8:6e:e6:2a:22:64:51:5e:6f:db:13:4c:70:6f:d5:fd:7c:3f:
         14:cc:97:e6:af:23:93:16:fc:f8:86:59:ed:c2:4d:5f:82:f1:
         b5:9f:84:ab:66:01:4d:66:98:35:6b:03:79:b5:76:f0:88:e7:
         62:b1:3c:2c:95:0e:3d:0b:84:02:1f:98:84:58:23:35:1c:4c:
         4b:03:91:91
The prerequisites for the scenario (issued by the IT department):
-
A signed NiFi server certificate for the specified host (
secure.nififor this example) in PEM format (nifi.pem) -
The matching private key in PEM format (
nifi.key) -
A signed client certificate for the specified user (
CN=my_username, …for this example) in PEM format (client.pem) -
The matching private key in PEM format (
client.key) -
The CA certificate in PEM format (
cacert.pem)
| For more information on converting certificates between various forms, see Toolkit Guide: Additional Certificate Commands. |
The end result will consist of a self-signed external CA (the root), a keystore and truststore containing the necessary certificates for the NiFi instance to operate, and a client certificate for a human user to access NiFi.
Depending on the version of Java used, some commands below may display a warning Warning:
The JKS keystore uses a proprietary format. It is recommended to migrate to PKCS12 which is an industry standard format using "keytool -importkeystore -srckeystore keystore.jks -destkeystore keystore.jks -deststoretype pkcs12". As of version 1.11.4, NiFi still handles JKS keystores better than PKCS12 keystores, but either is acceptable. This may change in future versions. PKCS12 keystores are used for client certificates and keys as browsers prefer loading this format.
|
-
Start in the directory where NiFi was downloaded and unarchived. For this section, the directory
/etc/nifi-1.11.4will be used. This directory will be referred to as the "NiFi home directory" and can be set explicitly (this is not done automatically by NiFi nor is it required).-
export NIFI_HOME="/etc/nifi-1.11.4/"— Sets an environment variable ($NIFI_HOME) which references the installation directory (optional) -
cd /etc/nifi-1.11.4— Changes the terminal to the NiFi home directory -
ls -alGh— Lists the contents of the directory (optional)
-
-
Determine if the server certificate (
nifi.pem) contains the complete certificate chain or just the server certificate. If the sequence-----BEGIN CERTIFICATE-----occurs only once, this is just the server certificate. If it occurs multiple times, the certificate chain is present. If the certificate chain is present, continue with Step 4. If it is not present, continue to Step 3.-
cat nifi.pem— Prints the Base64-encoded contents
-
-
Concatenate the server certificate and CA certificate to form the certificate chain.
-
cat cacert.pem >> nifi.pem— Concatenates the CA certificate to the NiFi server certificate in the proper order
-
-
Form the PKCS12 keystore from the certificate chain and private key.
-
openssl pkcs12 -export -out nifi.p12 -inkey nifi.key -in nifi.pem -name nifi-key— Generates the PKCS12 keystore containing the private key and certificate chain under the aliasnifi-key. The command will prompt for an export password. Choose a secure password and enter it twice for confirmation (for this scenario, the bad examplepasswordpasswordis used) -
keytool -list -v -keystore nifi.p12— Verifies the contents of the PKCS12 keystore (optional). This command will prompt for the same password entered on the previous stepThe certificate chain length is 2, starting with the server certificate and including the CA certificate. keytool -list -v -keystore nifi.p12 Enter keystore password: Keystore type: PKCS12 Keystore provider: SUN Your keystore contains 1 entry Alias name: 1 Creation date: Apr 5, 2020 Entry type: PrivateKeyEntry Certificate chain length: 2 Certificate[1]: Owner: CN=secure.nifi, OU=Apache NiFi Walkthrough, O=Apache NiFi CA, L=Santa Monica, ST=CA, C=US Issuer: CN=Apache NiFi CA CA, OU=Secure Digital Certificate Signing, O=Apache NiFi CA, L=Santa Monica, ST=CA, C=US Serial number: 511b Valid from: Sun Apr 05 15:41:49 PDT 2020 until: Mon Apr 05 15:41:49 PDT 2021 Certificate fingerprints: SHA1: C7:DD:26:7F:8E:25:45:2E:02:FE:34:FA:89:42:D8:BE:5B:88:AB:2D SHA256: 6E:A6:6C:BB:88:E3:24:99:5C:EB:C7:B8:02:D1:30:C4:AC:6D:0C:F2:40:46:DA:CB:6A:15:13:B7:49:40:FA:99 Signature algorithm name: SHA256withRSA Subject Public Key Algorithm: 2048-bit RSA key Version: 3 Extensions: #1: ObjectId: 1.3.6.1.5.5.7.1.1 Criticality=false AuthorityInfoAccess [ [ accessMethod: ocsp accessLocation: URIName: http://ocsp.tinycert.org/ca-2405 , accessMethod: caIssuers accessLocation: URIName: http://aia.tinycert.org/ca-2405.crt ] ] #2: ObjectId: 2.5.29.35 Criticality=false AuthorityKeyIdentifier [ KeyIdentifier [ 0000: 64 A2 F6 E9 F1 1A 9B 0F 40 5E 0F 23 DC AC 16 20 d.......@^.#... 0010: 6B 5A F3 74 kZ.t ] ] #3: ObjectId: 2.5.29.19 Criticality=false BasicConstraints:[ CA:false PathLen: undefined ] #4: ObjectId: 2.5.29.31 Criticality=false CRLDistributionPoints [ [DistributionPoint: [URIName: http://crl.tinycert.org/ca-2405.crl] ]] #5: ObjectId: 2.5.29.37 Criticality=false ExtendedKeyUsages [ serverAuth clientAuth codeSigning emailProtection timeStamping ] #6: ObjectId: 2.5.29.15 Criticality=false KeyUsage [ DigitalSignature Non_repudiation Key_Encipherment Data_Encipherment Key_Agreement ] #7: ObjectId: 2.16.840.1.113730.1.1 Criticality=false NetscapeCertType [ SSL client SSL server S/MIME Object Signing ] #8: ObjectId: 2.5.29.17 Criticality=false SubjectAlternativeName [ DNSName: secure.nifi IPAddress: 127.0.0.1 DNSName: localhost ] #9: ObjectId: 2.5.29.14 Criticality=false SubjectKeyIdentifier [ KeyIdentifier [ 0000: F2 83 0F C6 05 4A EA 30 8F 34 81 8A 5D 96 1D CD .....J.0.4..]... 0010: 35 FC 2B 07 5.+. ] ] Certificate[2]: Owner: CN=Apache NiFi CA CA, OU=Secure Digital Certificate Signing, O=Apache NiFi CA, L=Santa Monica, ST=CA, C=US Issuer: CN=Apache NiFi CA CA, OU=Secure Digital Certificate Signing, O=Apache NiFi CA, L=Santa Monica, ST=CA, C=US Serial number: 0 Valid from: Mon Feb 08 20:24:06 PST 2016 until: Thu Feb 05 20:24:06 PST 2026 Certificate fingerprints: SHA1: E9:CA:EF:26:C7:2A:AF:7A:FD:BC:97:12:ED:F5:6B:3B:79:40:D2:A3 SHA256: 4C:0A:2F:C4:D3:CC:B5:A8:0E:0B:95:EE:0C:E6:60:7C:85:78:7A:58:77:BB:87:58:12:9B:D1:E4:BA:E0:9B:67 Signature algorithm name: SHA256withRSA Subject Public Key Algorithm: 2048-bit RSA key Version: 3 Extensions: #1: ObjectId: 2.5.29.19 Criticality=true BasicConstraints:[ CA:true PathLen:2147483647 ] #2: ObjectId: 2.5.29.31 Criticality=false CRLDistributionPoints [ [DistributionPoint: [URIName: http://crl.tinycert.org/ca-2405.crl] ]] #3: ObjectId: 2.5.29.18 Criticality=false IssuerAlternativeName [ RFC822Name: andy@andylopresto.com ] #4: ObjectId: 2.5.29.15 Criticality=true KeyUsage [ DigitalSignature Key_Encipherment Key_Agreement Key_CertSign ] #5: ObjectId: 2.5.29.17 Criticality=false SubjectAlternativeName [ RFC822Name: andy@andylopresto.com ] #6: ObjectId: 2.5.29.14 Criticality=false SubjectKeyIdentifier [ KeyIdentifier [ 0000: 64 A2 F6 E9 F1 1A 9B 0F 40 5E 0F 23 DC AC 16 20 d.......@^.#... 0010: 6B 5A F3 74 kZ.t ] ] ******************************************* *******************************************
-
-
Convert the PKCS12 keystore for the NiFi instance into the Java KeyStore file (
keystore.jks). PKCS12 keystores are usable by NiFi, but JKS format is handled more robustly and causes fewer edge cases. JKS keystores cannot be formed directly from PEM files, so the PKCS12 keystore serves as an intermediate form.-
keytool -importkeystore -srckeystore nifi.p12 -srcstoretype pkcs12 -srcalias nifi-key -destkeystore keystore.jks
-deststoretype jks -destalias nifi-key
— Converts the PKCS12 keystore to a JKS keystore. This command will prompt for a new keystore password twice, then prompt for the password set on the PKCS12 keystore from the previous step
-
-
Convert the CA certificate into the NiFi truststore (
truststore.jks) to allow trusted incoming connections.-
keytool -importcert -alias nifi-cert -file cacert.pem -keystore truststore.jks— Imports the CA certificate into the truststore. This command will prompt for a new truststore password twice% keytool -importcert -alias nifi-cert -file cacert.pem -keystore truststore.jks Enter keystore password: Re-enter new password: Owner: CN=Apache NiFi CA CA, OU=Secure Digital Certificate Signing, O=Apache NiFi CA, L=Santa Monica, ST=CA, C=US Issuer: CN=Apache NiFi CA CA, OU=Secure Digital Certificate Signing, O=Apache NiFi CA, L=Santa Monica, ST=CA, C=US Serial number: 0 Valid from: Mon Feb 08 20:24:06 PST 2016 until: Thu Feb 05 20:24:06 PST 2026 Certificate fingerprints: SHA1: E9:CA:EF:26:C7:2A:AF:7A:FD:BC:97:12:ED:F5:6B:3B:79:40:D2:A3 SHA256: 4C:0A:2F:C4:D3:CC:B5:A8:0E:0B:95:EE:0C:E6:60:7C:85:78:7A:58:77:BB:87:58:12:9B:D1:E4:BA:E0:9B:67 Signature algorithm name: SHA256withRSA Subject Public Key Algorithm: 2048-bit RSA key Version: 3 Extensions: #1: ObjectId: 2.5.29.19 Criticality=true BasicConstraints:[ CA:true PathLen:2147483647 ] #2: ObjectId: 2.5.29.31 Criticality=false CRLDistributionPoints [ [DistributionPoint: [URIName: http://crl.tinycert.org/ca-2405.crl] ]] #3: ObjectId: 2.5.29.18 Criticality=false IssuerAlternativeName [ RFC822Name: andy@andylopresto.com ] #4: ObjectId: 2.5.29.15 Criticality=true KeyUsage [ DigitalSignature Key_Encipherment Key_Agreement Key_CertSign ] #5: ObjectId: 2.5.29.17 Criticality=false SubjectAlternativeName [ RFC822Name: andy@andylopresto.com ] #6: ObjectId: 2.5.29.14 Criticality=false SubjectKeyIdentifier [ KeyIdentifier [ 0000: 64 A2 F6 E9 F1 1A 9B 0F 40 5E 0F 23 DC AC 16 20 d.......@^.#... 0010: 6B 5A F3 74 kZ.t ] ] Trust this certificate? [no]: yes Certificate was added to keystore
-
-
Optionally, move the
keystore.jksandtruststore.jksfiles into theconf/directory. This step is not required, but helps with organization. -
Configure the
nifi.propertiesfile with the necessary values. This includes setting the hostname, ports, and keystore and truststore paths and passwords.-
$EDITOR conf/nifi.properties— Opens thenifi.propertiesfile in a text editor -
Update the following lines:
-
nifi.remote.input.host=→nifi.remote.input.host=secure.nifi -
nifi.remote.input.secure=false→nifi.remote.input.secure=true -
nifi.remote.input.socket.port=→nifi.remote.input.socket.port=10443 -
nifi.web.http.port=8080→nifi.web.http.port= -
nifi.web.https.host=→nifi.web.https.host=secure.nifi -
nifi.web.https.port=→nifi.web.https.port=9443 -
nifi.security.keystore=→nifi.security.keystore=./conf/keystore.jks -
nifi.security.keystoreType=→nifi.security.keystoreType=jks -
nifi.security.keystorePasswd=→nifi.security.keystorePasswd=passwordpassword -
nifi.security.truststore=→nifi.security.truststore=./conf/truststore.jks -
nifi.security.truststoreType=→nifi.security.truststoreType=jks -
nifi.security.truststorePasswd=→nifi.security.truststorePasswd=passwordpassword
-
-
-
Generate the client certificate keystore from the client certificate and key.
-
openssl pkcs12 -export -out CN=my_username.p12 -inkey client.key -in client.pem— Creates the PKCS12 keystore containing the client certificate and private key. This command prompts for an export password twice
-
From this point, the instructions are identical to those using the TLS Toolkit, starting at Loading the client certificate in the browser.
Securing NiFi with TLS Toolkit and Provided Intermediate CA
Occasionally, an IT department will provide an intermediate CA certificate which is signed by a trusted certificate and can be used to generate server and client certificates on-demand by the NiFi admin without further intervention by the IT department. The TLS toolkit provides a mechanism to use the intermediate certificate to sign generated certificates.
The end result will consist of a self-signed external CA (the root), an intermediate CA used to sign NiFi certificates, a keystore and truststore containing the necessary certificates for the NiFi instance to operate, and a client certificate for a human user to access NiFi.
| Develop section |
Deploying a NiFi Cluster
Apache NiFi can run in either standalone or clustered mode. A standalone node is often sufficient for dataflow operations, but in a production or high-volume environment, a cluster is more performant and resilient. For more information, see NiFi Administrator’s Guide: Clustering.
Configuring a Host to Resolve Arbitrary DNS Hostnames
This section provides instructions to configure a single host machine to resolve dynamic hostnames via DNS using a tool called dnsmasq. This is useful if deploying a NiFi cluster to a single host machine to logically separate nodes running side-by-side. There are many options to achieve this outcome; this is one approach.
|
Description |
Instructions on installing and configuring dynamic DNS hostname resolution |
Purpose |
A NiFi cluster with multiple nodes needs to communicate between them and if all nodes are |
Starting Point |
N/A |
Expected Outcome |
The host machine can resolve arbitrary DNS hostnames without impacting normal network connectivity |
Helpful Reading |
N/A |
Estimated Duration |
5 minutes |
Machines resolve DNS hostnames (e.g. nifi.apache.org) to IP addresses (95.216.24.32). Each node in a NiFi cluster needs a hostname (e.g. node1.nificluster.com) to use while serving the UI/API and to communicate with peer nodes. When deploying a cluster of multiple nodes on the same physical/virtual host, each node can receive a different, non-conflicting set of ports, but the hostname (localhost) would conflict. By allowing arbitrary hostname resolution, each node can reside side-by-side but be identified uniquely.
For this guide, any hostname which ends in .nifi will resolve to localhost.
Prerequisites:
-
A *nix (or similar) operating system
-
A package manager (e.g.
apt-get,yum,brew). The instructions below usebrew; substitute the command for the relevant package manager inline
The end result will resolve *.nifi hostnames to the local machine and all other names with the pre-existing DNS resolution services.
-
Install and configure dnsmasq.
-
Install dnsmasq.
-
brew install dnsmasqhost@macbook ~ % brew install dnsmasq ==> Fetching dnsmasq ==> Downloading https://ghcr.io/v2/homebrew/core/dnsmasq/manifests/2.89 ########################################################################## 100.0% ==> Downloading https://ghcr.io/v2/homebrew/core/dnsmasq/blobs/sha256:490265bd8d3e8392380fff3b0fbb4caf65f918366b5cf8c613372d21844860aa ==> Downloading from https://pkg-containers.githubusercontent.com/ghcr1/blobs/sha256:490265bd8d3e8392380fff3b0fbb4caf65f918366b5cf8c61... ########################################################################## 100.0% ==> Pouring dnsmasq--2.89.arm64_ventura.bottle.tar.gz ==> Caveats To start dnsmasq now and restart at startup: sudo brew services start dnsmasq Or, if you don't want/need a background service you can just run: /opt/homebrew/opt/dnsmasq/sbin/dnsmasq --keep-in-foreground -C /opt/homebrew/etc/dnsmasq.conf -7 /opt/homebrew/etc/dnsmasq.d,*.conf ==> Summary 🍺 /opt/homebrew/Cellar/dnsmasq/2.89: 10 files, 646.3KB
-
-
Start dnsmasq using the service manager.
-
sudo brew services start dnsmasq
-
-
Make a new file
development.confin/opt/homebrew/etc/dnsmasq.d/. This file defines the address pattern to resolve. Here,$EDITORis an environment variable defined as path to a text editor. You can use any text editor of your choice (Sublime Text, Atom, vi, emacs, nano, etc.).-
$EDITOR /opt/homebrew/etc/dnsmasq.d/development.conf— creates and opensdevelopment.conffile for editing
-
-
Populate the
development.confwith the address pattern. Theaddress/line defines the pattern and the# Directline is a comment describing the pattern.-
Add the following lines to
development.conf:# Test NiFi instances address=/.nifi/127.0.0.1 # Direct any hostnames ending in .nifi to 127.0.0.1
-
-
Create a directory
resolverin/etcdirectory.-
sudo mkdir /etc/resolver— creates 'resolver' directory
-
-
Create a new file
nifiin/etc/resolver/. This filename must match the top-level domain (TLD) to be resolved (e.g.hostname.nifi→nifi,hostname.example→example).-
sudo $EDITOR /etc/resolver/nifi
-
-
Populate the
nififile and register a new DNS resolver (dnsmasqrunning on this host) with the OS.-
Add the following line to
nifi:nameserver 127.0.0.1
-
-
Restart
dnsmasq:-
sudo brew services restart dnsmasq
-
-
-
To test successful deployment of the new DNS resolver, ping two addresses. One is an external site not hosted by this machine to demonstrate that regular DNS functionality remains, and the other is a new hostname which this machine will respond to.
-
Ping an existing website hosted externally (https://nifi.apache.org).
-
ping -c 1 nifi.apache.orgPING nifi.apache.org (95.216.24.32): 56 data bytes 64 bytes from 95.216.24.32: icmp_seq=0 ttl=48 time=189.600 msHere the
nifi.apache.orgresolution is done by the system’s default DNS resolver and resolves to95.216.24.32(not this machine).
-
-
Ping a non-existent website which this machine should resolve locally (http://imaginary.node.nifi).
-
ping -c 1 imaginary.node.nifiPING imaginary.node.nifi (127.0.0.1): 56 data bytes 64 bytes from 127.0.0.1: icmp_seq=0 ttl=64 time=0.026 msHere the
*.nifiresolution redirects to the host machine’s IP (127.0.0.1) which was configured via the/etc/resolver/nififile.
-
-
Creating a NiFi Cluster
Description |
Instructions on configuring a 3 node unsecured cluster |
Purpose |
A NiFi cluster can perform flow operations in parallel and provide resiliency if nodes are unavailable. |
Starting Point |
|
Expected Outcome |
3 nodes of latest version of Apache NiFi in an unsecured cluster running on local machine |
Helpful Reading |
|
Estimated Duration |
10 minutes |
| Needs a diagram |
| Develop section |
-
Copy the NiFi run directory 3x
-
Configure the settings
-
Start each node
Creating and Securing a NiFi Cluster with the TLS Toolkit
| This section assumes no enterprise IT department to provide signed certificates. For a scenario with provided certificates, see Securing NiFi with Provided Certificates. |
Description |
Instructions on configuring and securing a 3 node cluster |
Purpose |
A NiFi cluster can perform flow operations in parallel and provide resiliency if nodes are unavailable. |
Starting Point |
|
Expected Outcome |
3 nodes of latest version of Apache NiFi in secured cluster running on local machine |
Helpful Reading |
Securing NiFi with TLS Toolkit, Creating a NiFi Cluster, Configuring a Host to Resolve Arbitrary DNS Hostnames |
Estimated Duration |
15 minutes |
Similar to a standalone instance, a NiFi cluster must have TLS configured to enable authentication and authorization mechanisms. However, the cluster communication protocol used by NiFi and the framework authentication and authorization must also be configured to allow nodes to communicate.
For this guide, the three nodes will be referred to as node1, node2, and node3. Each will have a $NIFI_HOME environment variable which points to the respective "NiFi home directory".
Prerequisites:
-
DNS configuration for three hosts using the addresses
node1.nifi,node2.nifi,node3.nifi-
This can be all side-by-side on the same physical host, using virtual machines, or using independent physical machines
-
-
Ports open to allow the nodes to communicate
-
If these machines are subject to a firewall, ensure that the following ports are open:
-
2181,2888,3888— ZooKeeper ports -
6342— Load-balancing port -
9443— HTTPS port for NiFi UI/API -
10443— Site to site port -
11443— Cluster communications port
-
-
If all the nodes will run on the same machine, the port scheme will end in the respective node identifier to avoid conflicts (e.g. HTTPS port
9441fornode1,9442fornode2,9443fornode3). Ensure that the following ports are open:-
2181, 2182, 2183— ZooKeeper ports (client port) -
2881, 2882, 2883— ZooKeeper ports (node connection port) -
3881, 3882, 3883— ZooKeeper ports (leader election port) -
6341, 6342, 6343— Load-balancing port -
9441, 9442, 9443— HTTPS port for NiFi UI/API -
10441, 10442, 10443— Site to site port -
11441, 11442, 11443— Cluster communications port
-
-
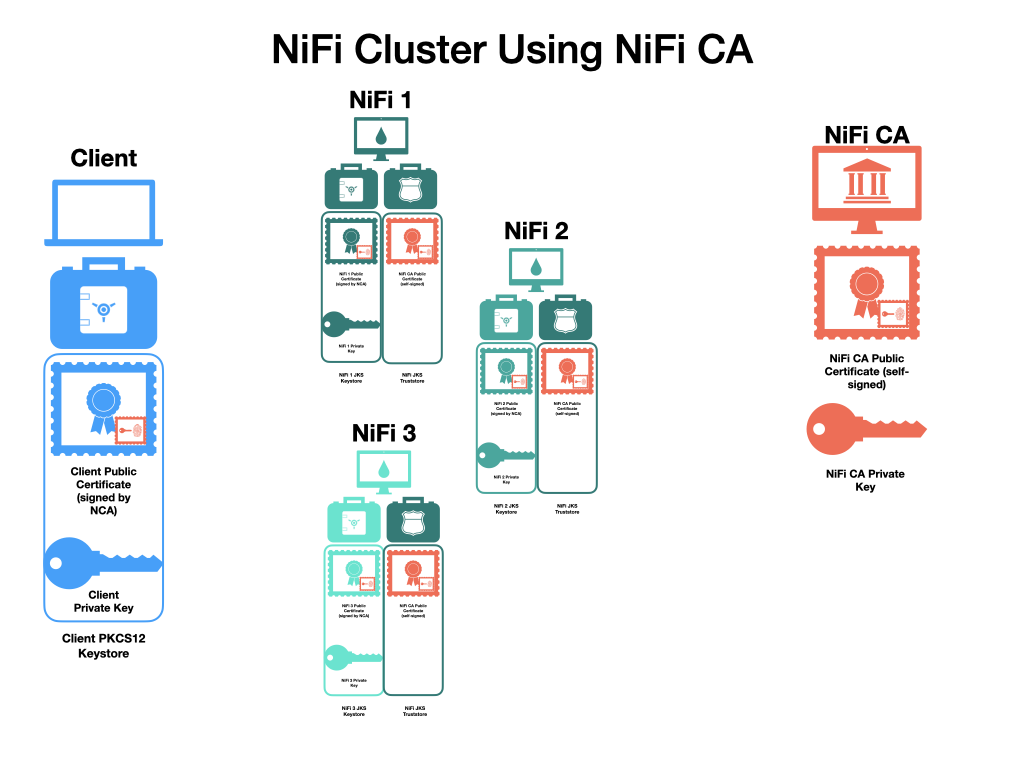
The end result will consist of a self-signed external CA (the root), a keystore and truststore containing the necessary certificates for each NiFi node to operate, and a client certificate for a human user to access NiFi.
-
Create the NiFi Client Certificates. When using the
standalonemode of the TLS Toolkit, it is important that all certificates are generated from the same instance, using the same generated NiFi CA certificate to sign each. The certificates can be generated by a single command, or individually. By default, the Distinguished Name (DN) will beCN=<provided_hostname>, OU=NIFI. For more information on toolkit flag options, see NiFi Toolkit Guide: TLS Toolkit Usage.-
Create a directory for the cluster configuration and navigate to it.
-
mkdir /opt/nifi_cluster_conf && cd /opt/nifi_cluster_conf
-
-
Generate the certificates. Running these commands first generates the NiFi CA public certificate and private key if not present, then generates the server certificates, followed by the client certificate necessary for the Initial Admin Identity. An alternative command performing all the steps sequentially is also provided.
-
/opt/nifi-toolkit-1.22.0/bin/tls-toolkit.sh standalone -n 'node1.nifi' -c 'ca.nifi'— Generates the NiFi CA (ca.nifi) certificate and key if not present and generates and signsnode1certificate, placing thekeystore.jks,truststore.jks, and populatednifi.propertiesin a subdirectory callednode1.nifiNote the creation of the CA certificate and key
% /opt/nifi-toolkit-1.22.0/bin/tls-toolkit.sh standalone -n 'node1.nifi' -c 'ca.nifi' [main] INFO org.apache.nifi.toolkit.tls.standalone.TlsToolkitStandaloneCommandLine - No nifiPropertiesFile specified, using embedded one. [main] INFO org.apache.nifi.toolkit.tls.standalone.TlsToolkitStandalone - Running standalone certificate generation with output directory ../nifi_cluster_conf [main] INFO org.apache.nifi.toolkit.tls.standalone.TlsToolkitStandalone - Generated new CA certificate ../nifi_cluster_conf/nifi-cert.pem and key ../nifi_cluster_conf/nifi-key.key [main] INFO org.apache.nifi.toolkit.tls.standalone.TlsToolkitStandalone - Writing new ssl configuration to ../nifi_cluster_conf/node1.nifi [main] INFO org.apache.nifi.toolkit.tls.standalone.TlsToolkitStandalone - Successfully generated TLS configuration for node1.nifi 1 in ../nifi_cluster_conf/node1.nifi [main] INFO org.apache.nifi.toolkit.tls.standalone.TlsToolkitStandalone - No clientCertDn specified, not generating any client certificates. [main] INFO org.apache.nifi.toolkit.tls.standalone.TlsToolkitStandalone - tls-toolkit standalone completed successfully % ls -alGh node1.nifi total 56 drwx------@ 5 johndoe wheel 160B Jun 26 17:33 . drwxr-xr-x@ 5 johndoe wheel 160B Jun 26 17:33 .. -rw-------@ 1 johndoe wheel 3.0K Jun 26 17:33 keystore.jks -rw-------@ 1 johndoe wheel 17K Jun 26 17:33 nifi.properties -rw-------@ 1 johndoe wheel 929B Jun 26 17:33 truststore.jks -
/opt/nifi-toolkit-1.22.0/bin/tls-toolkit.sh standalone -n 'node2.nifi'— Generates and signsnode2certificate with the same CANote the existing CA certificate being used
% /opt/nifi-toolkit-1.22.0/bin/tls-toolkit.sh standalone -n 'node2.nifi' [main] INFO org.apache.nifi.toolkit.tls.standalone.TlsToolkitStandaloneCommandLine - No nifiPropertiesFile specified, using embedded one. [main] INFO org.apache.nifi.toolkit.tls.standalone.TlsToolkitStandalone - Running standalone certificate generation with output directory ../nifi_cluster_conf [main] INFO org.apache.nifi.toolkit.tls.util.TlsHelper - Verifying the certificate signature for CN=ca.nifi,OU=NIFI [main] INFO org.apache.nifi.toolkit.tls.util.TlsHelper - Attempting to verify certificate CN=ca.nifi,OU=NIFI signature with CN=ca.nifi,OU=NIFI [main] INFO org.apache.nifi.toolkit.tls.util.TlsHelper - Certificate was signed by CN=ca.nifi,OU=NIFI [main] INFO org.apache.nifi.toolkit.tls.standalone.TlsToolkitStandalone - Using existing CA certificate ../nifi_cluster_conf/nifi-cert.pem and key ../nifi_cluster_conf/nifi-key.key [main] INFO org.apache.nifi.toolkit.tls.standalone.TlsToolkitStandalone - Writing new ssl configuration to ../nifi_cluster_conf/node2.nifi [main] INFO org.apache.nifi.toolkit.tls.standalone.TlsToolkitStandalone - Successfully generated TLS configuration for node2.nifi 1 in ../nifi_cluster_conf/node2.nifi [main] INFO org.apache.nifi.toolkit.tls.standalone.TlsToolkitStandalone - No clientCertDn specified, not generating any client certificates. [main] INFO org.apache.nifi.toolkit.tls.standalone.TlsToolkitStandalone - tls-toolkit standalone completed successfully -
/opt/nifi-toolkit-1.22.0/bin/tls-toolkit.sh standalone -n 'node3.nifi'— Generates and signsnode3certificate with the same CA% /opt/nifi-toolkit-1.22.0/bin/tls-toolkit.sh standalone -n 'node3.nifi' [main] INFO org.apache.nifi.toolkit.tls.standalone.TlsToolkitStandaloneCommandLine - No nifiPropertiesFile specified, using embedded one. [main] INFO org.apache.nifi.toolkit.tls.standalone.TlsToolkitStandalone - Running standalone certificate generation with output directory ../nifi_cluster_conf [main] INFO org.apache.nifi.toolkit.tls.util.TlsHelper - Verifying the certificate signature for CN=ca.nifi,OU=NIFI [main] INFO org.apache.nifi.toolkit.tls.util.TlsHelper - Attempting to verify certificate CN=ca.nifi,OU=NIFI signature with CN=ca.nifi,OU=NIFI [main] INFO org.apache.nifi.toolkit.tls.util.TlsHelper - Certificate was signed by CN=ca.nifi,OU=NIFI [main] INFO org.apache.nifi.toolkit.tls.standalone.TlsToolkitStandalone - Using existing CA certificate ../nifi_cluster_conf/nifi-cert.pem and key ../nifi_cluster_conf/nifi-key.key [main] INFO org.apache.nifi.toolkit.tls.standalone.TlsToolkitStandalone - Writing new ssl configuration to ../nifi_cluster_conf/node3.nifi [main] INFO org.apache.nifi.toolkit.tls.standalone.TlsToolkitStandalone - Successfully generated TLS configuration for node3.nifi 1 in ../nifi_cluster_conf/node3.nifi [main] INFO org.apache.nifi.toolkit.tls.standalone.TlsToolkitStandalone - No clientCertDn specified, not generating any client certificates. [main] INFO org.apache.nifi.toolkit.tls.standalone.TlsToolkitStandalone - tls-toolkit standalone completed successfully -
/opt/nifi-toolkit-1.22.0/bin/tls-toolkit.sh standalone -C 'CN=my_username'— Generates and signsmy_usernameclient certificate with the same CA% /opt/nifi-toolkit-1.22.0/bin/tls-toolkit.sh standalone -C 'CN=my_username' [main] INFO org.apache.nifi.toolkit.tls.standalone.TlsToolkitStandaloneCommandLine - No nifiPropertiesFile specified, using embedded one. [main] INFO org.apache.nifi.toolkit.tls.standalone.TlsToolkitStandalone - Running standalone certificate generation with output directory ../nifi_cluster_conf [main] INFO org.apache.nifi.toolkit.tls.util.TlsHelper - Verifying the certificate signature for CN=ca.nifi,OU=NIFI [main] INFO org.apache.nifi.toolkit.tls.util.TlsHelper - Attempting to verify certificate CN=ca.nifi,OU=NIFI signature with CN=ca.nifi,OU=NIFI [main] INFO org.apache.nifi.toolkit.tls.util.TlsHelper - Certificate was signed by CN=ca.nifi,OU=NIFI [main] INFO org.apache.nifi.toolkit.tls.standalone.TlsToolkitStandalone - Using existing CA certificate ../nifi_cluster_conf/nifi-cert.pem and key ../nifi_cluster_conf/nifi-key.key [main] INFO org.apache.nifi.toolkit.tls.standalone.TlsToolkitStandalone - No hostnames specified, not generating any host certificates or configuration. [main] INFO org.apache.nifi.toolkit.tls.standalone.TlsToolkitStandalone - Generating new client certificate ../nifi_cluster_conf/CN=my_username.p12 [main] INFO org.apache.nifi.toolkit.tls.standalone.TlsToolkitStandalone - Successfully generated client certificate ../nifi_cluster_conf/CN=my_username.p12 [main] INFO org.apache.nifi.toolkit.tls.standalone.TlsToolkitStandalone - tls-toolkit standalone completed successfullyThe resulting directory will contain 7 new entries:
-
CN=my_username.p12— The client certificate in a PKCS12 keystore -
CN=my_username.password— The corresponding file containing the randomly-generated password. Use-bor--clientCertPasswordwhen generating to specify a password -
nifi-cert.pem— The CA certificate in PEM format -
nifi-key.key— The corresponding CA private key in PEM format -
node1.nifi/— The directory containingnode1keystore and related files -
node2.nifi/— The directory containingnode2keystore and related files -
node3.nifi/— The directory containingnode3keystore and related files
Optional command to execute all steps together using the toolkit pattern syntax:
-
-
/opt/nifi-toolkit-1.22.0/bin/tls-toolkit.sh standalone -n 'node[1-3].nifi' -C 'CN=my_username' -c 'ca.nifi'— Performs all steps listed above simultaneously
-
-
-
Create a new
nifi_clusterfolder in an appropriate location. In this example, where all three nodes will run on the same machine, the/etc/nifi_clusterdirectory is used. All further instructions occur from this directory.-
mkdir /etc/nifi_cluster— Creates the working directory -
cd /etc/nifi_cluster— Change to the created directory
-
-
Copy the NiFi installation folder (i.e.
nifi-1.22.0) to a new folder for each node in thenifi_clusterfolder created in the previous step.-
cp -R /etc/nifi-1.22.0 node1.nifi— Creates thenode1directory and copies the NiFi application into it -
cp -R /etc/nifi-1.22.0 node2.nifi— Creates thenode2directory and copies the NiFi application into it -
cp -R /etc/nifi-1.22.0 node3.nifi— Creates thenode3directory and copies the NiFi application into it
-
-
Copy the generated
keystore.jks,truststore.jks, andnifi.propertiesto theconf/directory of each node.-
cp -R /etc/nifi_cluster_configuration/node1.nifi/* node1.nifi/conf— Copies thenode1files -
cp -R /etc/nifi_cluster_configuration/node2.nifi/* node2.nifi/conf— Copies thenode2files -
cp -R /etc/nifi_cluster_configuration/node3.nifi/* node3.nifi/conf— Copies thenode3files
-
-
Modify the
nifi.propertiesfile for each node to set the appropriate ports and enable the embedded ZooKeeper server. If the nodes are being deployed to separate physical or virtual machines (such that each is treated as an independent host for networking), modifying the ports is not required, but enabling the embedded ZooKeeper servers is. If the nodes are being deployed on the same machine such that the ports cannot conflict, all parts of this step are required. This port selection convention follows the pattern defined at the top of this section, where the last digit corresponds to the node identifier. For more information on ZooKeeper configuration for NiFi, see NiFi Administrator’s Guide: Embedded ZooKeeper.The nifi.cluster.load.balance.host=entry must be manually populated here because it was added after the TLS Toolkit was last updated. The toolkit correctly populates the hostname in all other necessary properties. NOTE: Starting with version 1.14.0, NiFi requires a value fornifi.sensitive.props.key. Set the same value on each node.-
$EDITOR node1.nifi/conf/nifi.properties— Opens thenifi.propertiesfile in a text editor -
Update the following lines:
-
nifi.state.management.embedded.zookeeper.start=false→nifi.state.management.embedded.zookeeper.start=true -
nifi.remote.input.socket.port=10443→nifi.remote.input.socket.port=10441 -
nifi.web.https.port=9443→nifi.web.https.port=9441 -
nifi.sensitive.props.key=→nifi.sensitive.props.key=<secretKey> -
nifi.cluster.is.node=false→nifi.cluster.is.node=true -
nifi.cluster.node.protocol.port=11443→nifi.cluster.node.protocol.port=11441 -
nifi.cluster.load.balance.host=→nifi.cluster.load.balance.host=node1.nifi -
nifi.cluster.load.balance.port=6342→nifi.cluster.load.balance.port=6341 -
nifi.zookeeper.connect.string=→nifi.zookeeper.connect.string=node1.nifi:2181,node2.nifi:2182,node3.nifi:2183
-
-
$EDITOR node2.nifi/conf/nifi.properties— Opens thenifi.propertiesfile in a text editor. Note that thenifi.cluster.load.balance.port=6342does not need to change fornode2and is included for completeness -
Update the following lines:
-
nifi.state.management.embedded.zookeeper.start=false→nifi.state.management.embedded.zookeeper.start=true -
nifi.remote.input.socket.port=10443→nifi.remote.input.socket.port=10442 -
nifi.web.https.port=9443→nifi.web.https.port=9442 -
nifi.sensitive.props.key=→nifi.sensitive.props.key=<secretKey> -
nifi.cluster.is.node=false→nifi.cluster.is.node=true -
nifi.cluster.node.protocol.port=11443→nifi.cluster.node.protocol.port=11442 -
nifi.cluster.load.balance.host=→nifi.cluster.load.balance.host=node2.nifi -
nifi.cluster.load.balance.port=6342→nifi.cluster.load.balance.port=6342 -
nifi.zookeeper.connect.string=→nifi.zookeeper.connect.string=node1.nifi:2181,node2.nifi:2182,node3.nifi:2183
-
-
$EDITOR node3.nifi/conf/nifi.properties— Opens thenifi.propertiesfile in a text editor. Note that some of the ports do not need to change fornode3and are included for completeness -
Update the following lines:
-
nifi.state.management.embedded.zookeeper.start=false→nifi.state.management.embedded.zookeeper.start=true -
nifi.remote.input.socket.port=10443→nifi.remote.input.socket.port=10443 -
nifi.web.https.port=9443→nifi.web.https.port=9443 -
nifi.sensitive.props.key=→nifi.sensitive.props.key=<secretKey> -
nifi.cluster.is.node=false→nifi.cluster.is.node=true -
nifi.cluster.node.protocol.port=11443→nifi.cluster.node.protocol.port=11443 -
nifi.cluster.load.balance.host=→nifi.cluster.load.balance.host=node3.nifi -
nifi.cluster.load.balance.port=6342→nifi.cluster.load.balance.port=6343 -
nifi.zookeeper.connect.string=→nifi.zookeeper.connect.string=node1.nifi:2181,node2.nifi:2182,node3.nifi:2183
-
-
-
Update the
zookeeper.propertiesfile on each node. This file contains the addresses of each embedded ZooKeeper server in the cluster. Thezookeeper.propertiesfile can be identical on each embedded ZooKeeper server (assuming no other changes were made), so the modified file will be copied to the other nodes.-
$EDITOR node1.nifi/conf/zookeeper.properties— Opens thezookeeper.propertiesfile in a text editor -
Update the following lines:
-
server.1=→server.1=node1.nifi:2881:3881;2181 -
Add the line
server.2=node2.nifi:2882:3882;2182 -
Add the line
server.3=node3.nifi:2883:3883;2183
-
-
cp node1.nifi/conf/zookeeper.properties node2.nifi/conf/zookeeper.properties— Copies the modifiedzookeeper.propertiesfile fromnode1tonode2 -
cp node1.nifi/conf/zookeeper.properties node3.nifi/conf/zookeeper.properties— Copies the modifiedzookeeper.propertiesfile fromnode1tonode3
-
-
Create the
myidfile on each node to identify the embedded ZooKeeper server.-
mkdir -p node1.nifi/state/zookeeper— Creates the ZooKeeper directory onnode1 -
echo 1 >> node1.nifi/state/zookeeper/myid— Creates themyidfile with thenode1identifier -
mkdir -p node2.nifi/state/zookeeper— Creates the ZooKeeper directory onnode2 -
echo 2 >> node2.nifi/state/zookeeper/myid— Creates themyidfile with thenode2identifier -
mkdir -p node3.nifi/state/zookeeper— Creates the ZooKeeper directory onnode3 -
echo 3 >> node3.nifi/state/zookeeper/myid— Creates themyidfile with thenode3identifier
-
-
Update the
state-management.xmlfile on each node to allow ZooKeeper connections. Thestate-management.xmlfile can be identical on each node (assuming no other changes were made), so the modified file will be copied to the other nodes.-
$EDITOR node1.nifi/conf/state-management.xml— Opens thestate-management.xmlfile in a text editor -
Update the following line:
-
<property name="Connect String"></property>→<property name="Connect String">node1.nifi:2181,node2.nifi:2182,node3.nifi:2183</property>
-
-
cp node1.nifi/conf/state-management.xml node2.nifi/conf/state-management.xml— Copies the modifiedstate-management.xmlfile fromnode1tonode2 -
cp node1.nifi/conf/state-management.xml node3.nifi/conf/state-management.xml— Copies the modifiedstate-management.xmlfile fromnode1tonode3
-
-
Update the
authorizers.xmlfile. This file contains the Initial Node Identities and Initial User Identities. The users consist of all human users and all nodes in the cluster. Theauthorizers.xmlfile can be identical on each node (assuming no other changes were made), so the modified file will be copied to the other nodes.Each Initial User Identitymust have a unique name (Initial User Identity 1,Initial User Identity 2, etc.).-
$EDITOR node1.nifi/conf/authorizers.xml— Opens theauthorizers.xmlfile in a text editor -
Update the following lines:
-
In the
<userGroupProvider>section,<property name="Initial User Identity 1"></property>→<property name="Initial User Identity 1">CN=my_username</property>— Adds an initial user with the DN generated in the client certificate -
In the
<userGroupProvider>section, add the line<property name="Initial User Identity 2">CN=node1.nifi, OU=NIFI</property>— Adds an initial user fornode1 -
In the
<userGroupProvider>section, add the line<property name="Initial User Identity 3">CN=node2.nifi, OU=NIFI</property>— Adds an initial user fornode2 -
In the
<userGroupProvider>section, add the line<property name="Initial User Identity 4">CN=node3.nifi, OU=NIFI</property>— Adds an initial user fornode3<userGroupProvider> <identifier>file-user-group-provider</identifier> <class>org.apache.nifi.authorization.FileUserGroupProvider</class> <property name="Users File">./conf/users.xml</property> <property name="Legacy Authorized Users File"></property> <property name="Initial User Identity 1">CN=my_username</property> <property name="Initial User Identity 2">CN=node1.nifi, OU=NIFI</property> <property name="Initial User Identity 3">CN=node2.nifi, OU=NIFI</property> <property name="Initial User Identity 4">CN=node3.nifi, OU=NIFI</property> </userGroupProvider> -
In the
<accessPolicyProvider>section,<property name="Initial Admin Identity"></property>→<property name="Initial Admin Identity">CN=my_username</property>— Adds an initial admin with the DN generated in the client certificate -
In the
<accessPolicyProvider>section,<property name="Node Identity 1"></property>→<property name="Node Identity 1">CN=node1.nifi, OU=NIFI</property>— Adds an initial node with the DN generated in thenode1certificate -
In the
<accessPolicyProvider>section, add the line<property name="Node Identity 2">CN=node2.nifi, OU=NIFI</property> -
In the
<accessPolicyProvider>section, add the line<property name="Node Identity 3">CN=node3.nifi, OU=NIFI</property><accessPolicyProvider> <identifier>file-access-policy-provider</identifier> <class>org.apache.nifi.authorization.FileAccessPolicyProvider</class> <property name="User Group Provider">file-user-group-provider</property> <property name="Authorizations File">./conf/authorizations.xml</property> <property name="Initial Admin Identity">CN=my_username</property> <property name="Legacy Authorized Users File"></property> <property name="Node Identity 1">CN=node1.nifi, OU=NIFI</property> <property name="Node Identity 2">CN=node2.nifi, OU=NIFI</property> <property name="Node Identity 3">CN=node3.nifi, OU=NIFI</property> <property name="Node Group"></property> </accessPolicyProvider>
-
-
cp node1.nifi/conf/authorizers.xml node2.nifi/conf/authorizers.xml— Copies the modifiedauthorizers.xmlfile fromnode1tonode2 -
cp node1.nifi/conf/authorizers.xml node3.nifi/conf/authorizers.xml— Copies the modifiedauthorizers.xmlfile fromnode1tonode3
-
-
By default, NiFi waits for nodes to join for 5 minutes before the cluster is available. Because the number of nodes is known, this delay can be modified on each node to start up much faster. (Optional)
-
$EDITOR node1.nifi/conf/nifi.properties— Opens thenifi.propertiesfile in a text editor -
Update the following lines:
-
nifi.cluster.flow.election.max.wait.time=5 mins→nifi.cluster.flow.election.max.wait.time=1 min— Changes the flow election wait time to 1 min, speeding up cluster availability -
nifi.cluster.flow.election.max.candidates=→nifi.cluster.flow.election.max.candidates=3— Changes the flow election to occur when 3 nodes are present, speeding up cluster availability
-
-
$EDITOR node2.nifi/conf/nifi.properties— Opens thenifi.propertiesfile in a text editor -
Update the following lines:
-
nifi.cluster.flow.election.max.wait.time=5 mins→nifi.cluster.flow.election.max.wait.time=1 min— Changes the flow election wait time to 1 min, speeding up cluster availability -
nifi.cluster.flow.election.max.candidates=→nifi.cluster.flow.election.max.candidates=3— Changes the flow election to occur when 3 nodes are present, speeding up cluster availability
-
-
$EDITOR node3.nifi/conf/nifi.properties— Opens thenifi.propertiesfile in a text editor -
Update the following lines:
-
nifi.cluster.flow.election.max.wait.time=5 mins→nifi.cluster.flow.election.max.wait.time=1 min— Changes the flow election wait time to 1 min, speeding up cluster availability -
nifi.cluster.flow.election.max.candidates=→nifi.cluster.flow.election.max.candidates=3— Changes the flow election to occur when 3 nodes are present, speeding up cluster availability
-
-
-
Start the NiFi cluster. Once all three nodes have started and joined the cluster, the flow is agreed upon and a cluster coordinator is elected, the UI is available on any of the three nodes.
-
./node1.nifi/bin/nifi.sh start— Startsnode1 -
./node2.nifi/bin/nifi.sh start— Startsnode2 -
./node3.nifi/bin/nifi.sh start— Startsnode3
-
-
Wait approximately 30 seconds and open the web browser to
https://node3.nifi:9443/nifi. The cluster should be available. Note that the Initial Admin Identity has no permissions on the root process group. This is an artifact of legacy design decisions where the root process group ID is not known at initial start time.The running cluster

The cluster status from the global menu at the top right
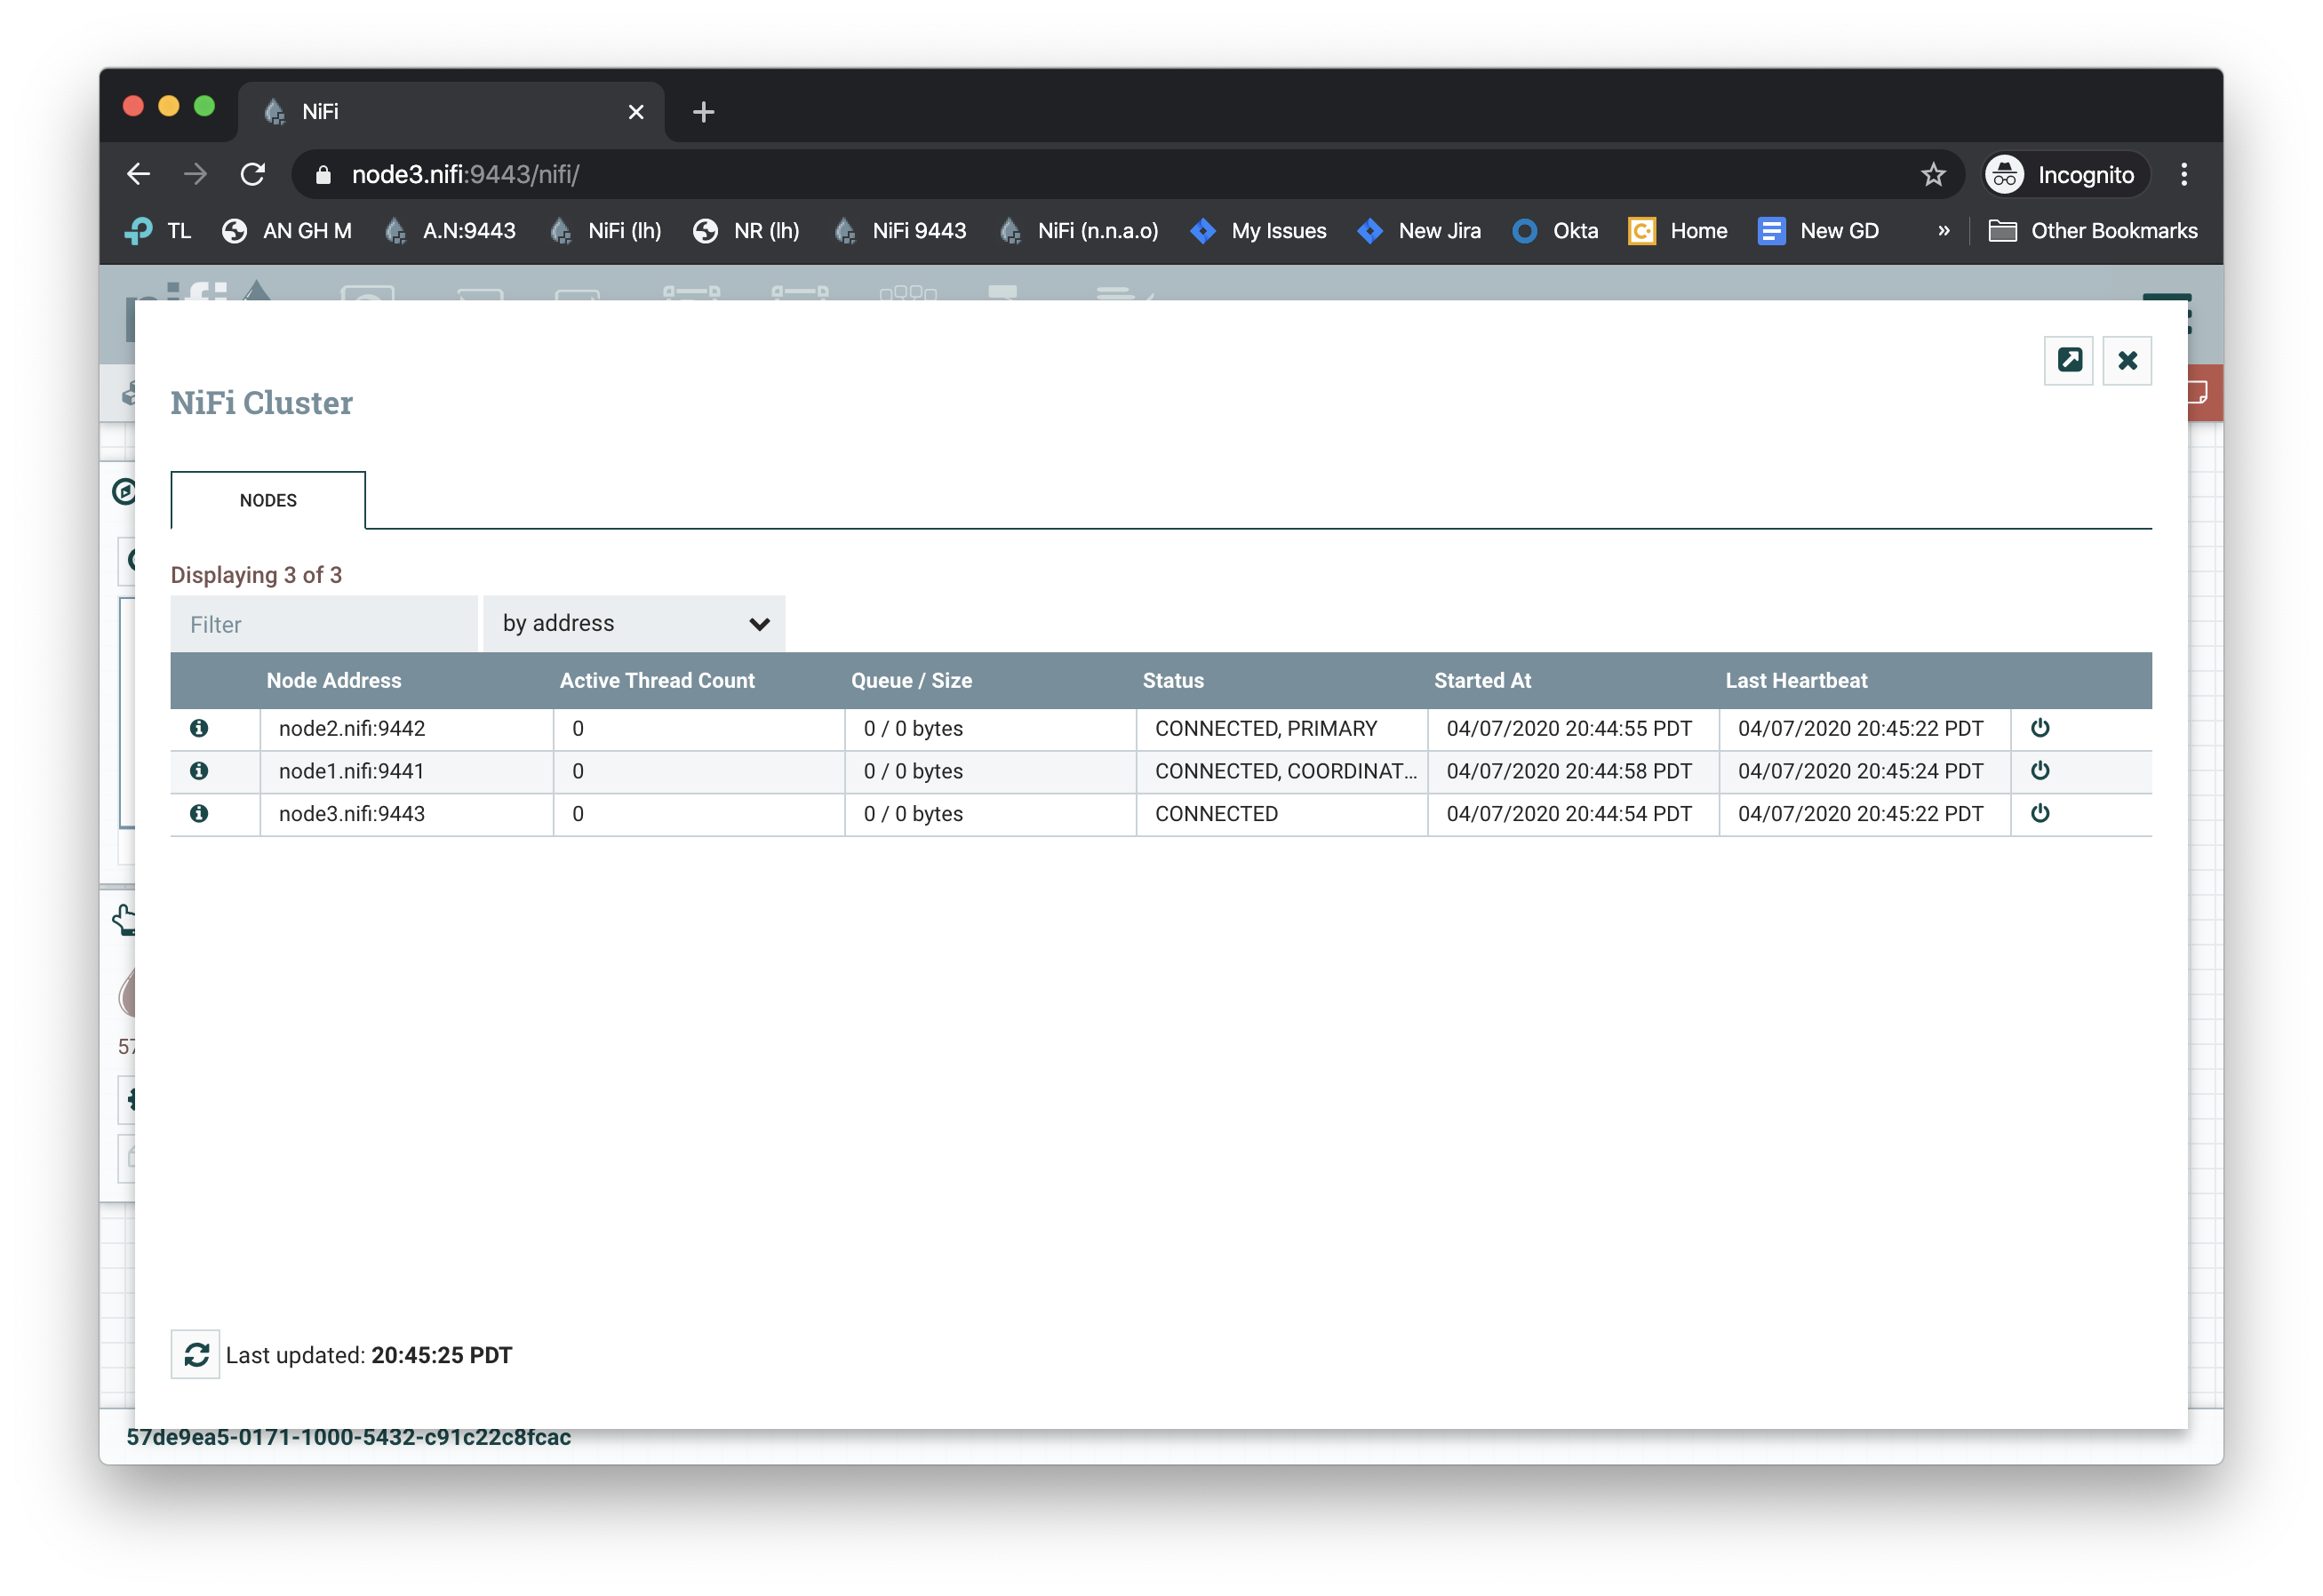
-
To update the Initial Admin Identity’s permissions for the root process group, stop each node in the cluster and remove the
authorizations.xmlandusers.xmlfile from each node. These files will be regenerated when the node starts again and be populated with the correct permissions.-
./node1.nifi/bin/nifi.sh stop— Stopsnode1 -
rm node1.nifi/conf/authorizations.xml node1.nifi/conf/users.xml— Removes theauthorizations.xmlandusers.xmlfornode1 -
./node2.nifi/bin/nifi.sh stop— Stopsnode2 -
rm node2.nifi/conf/authorizations.xml node2.nifi/conf/users.xml— Removes theauthorizations.xmlandusers.xmlfornode2 -
./node3.nifi/bin/nifi.sh stop— Stopsnode3 -
rm node3.nifi/conf/authorizations.xml node3.nifi/conf/users.xml— Removes theauthorizations.xmlandusers.xmlfornode3
-
-
Start the nodes again.
-
./node1.nifi/bin/nifi.sh start— Startsnode1 -
./node2.nifi/bin/nifi.sh start— Startsnode2 -
./node3.nifi/bin/nifi.sh start— Startsnode3The running cluster with permissions
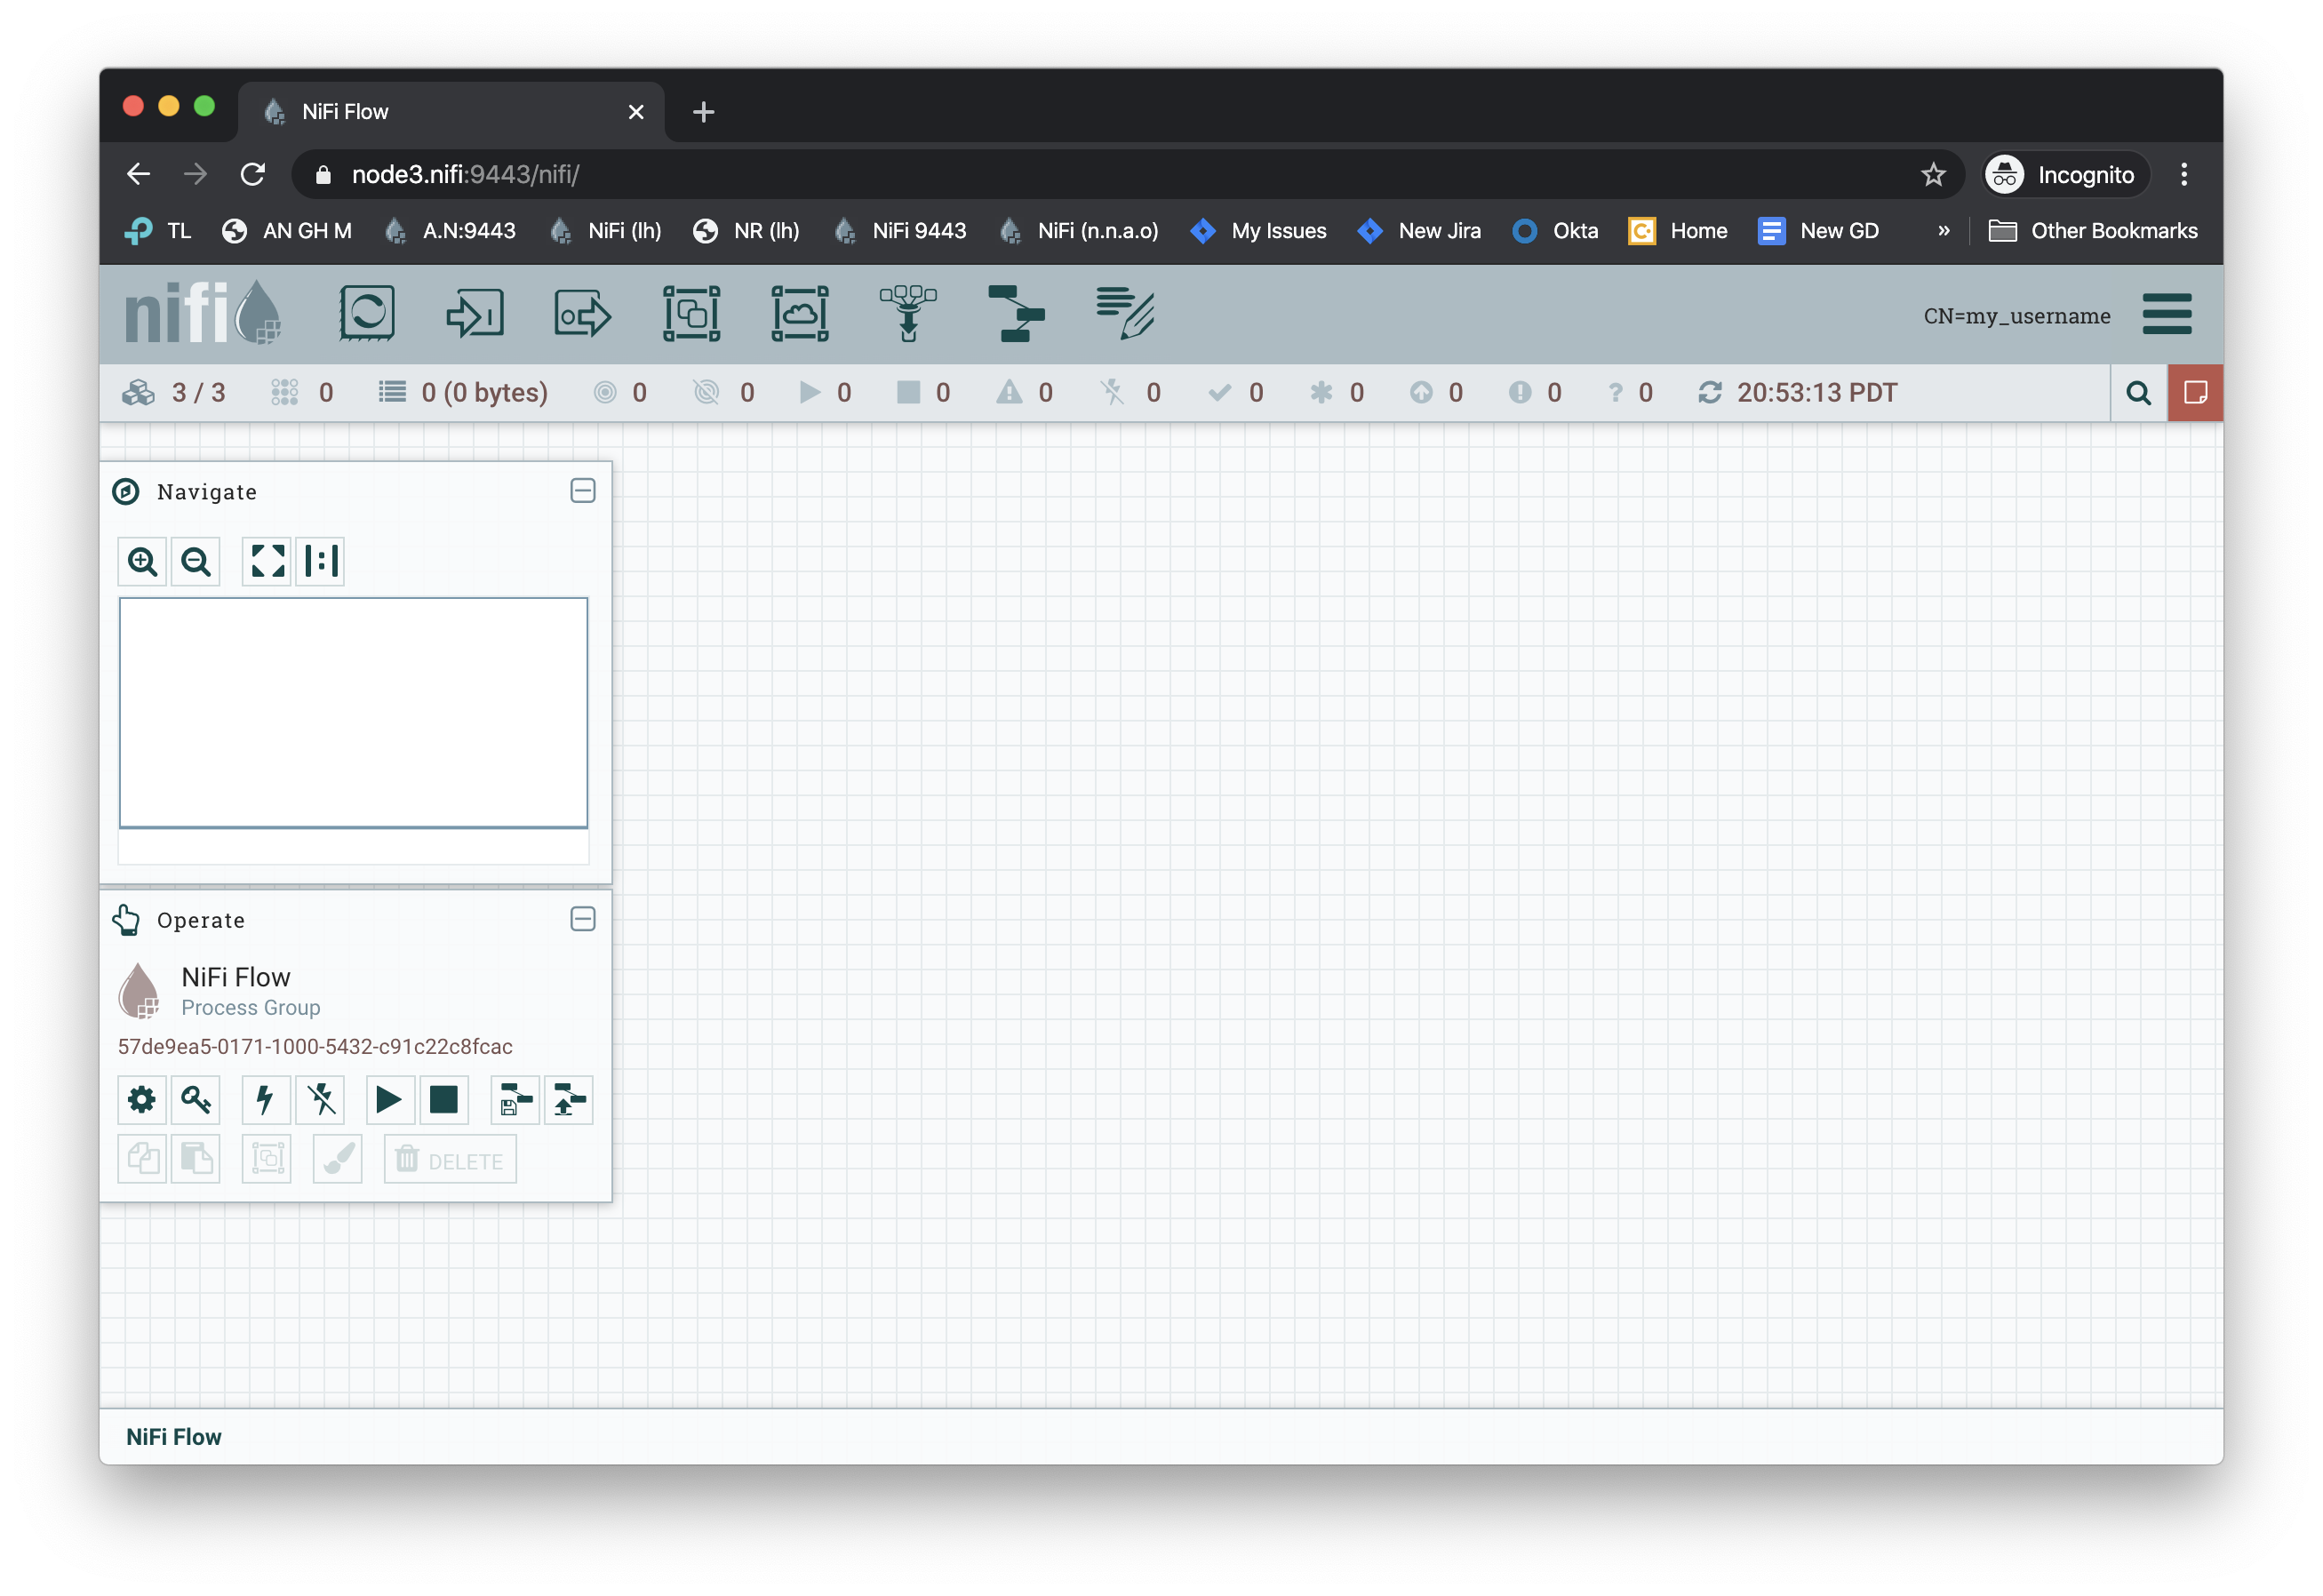
-